blog
Converting from Asynchronous to Synchronous Replication in PostgreSQL

High Availability is a requirement for just about every company around the world using PostgreSQL It is well known that PostgreSQL uses Streaming Replication as the replication method. PostgreSQL Streaming Replication is asynchronous by default, so it is possible to have some transactions committed in the primary node which have not yet been replicated to the standby server. This means there is the possibility of some potential data loss.
This delay in the commit process is supposed to be very small… if the standby server is powerful enough to keep up with the load. If this small data loss risk is not acceptable in the company, you can also use synchronous replication instead of the default.
In synchronous replication, each commit of a write transaction will wait until the confirmation that the commit has been written to the write-ahead log on disk of both the primary and standby server.
This method minimizes the possibility of data loss. For data loss to occur you would need both the primary and the standby to fail at the same time.
The disadvantage of this method is the same for all synchronous methods as with this method the response time for each write transaction increases. This is due to the need to wait until all the confirmations that the transaction was committed. Luckily, read-only transactions will not be affected by this but; only the write transactions.
In this blog, you show you how to install a PostgreSQL Cluster from scratch, convert the asynchronous replication (default) to a synchronous one. I’ll also show you how to rollback if the response time is not acceptable as you can easily go back to the previous state. You will see how to deploy, configure, and monitor a PostgreSQL synchronous replication easily using ClusterControl using only one tool for the entire process.
Installing a PostgreSQL Cluster
Let’s start to install and configure an async PostgreSQL replication, that is the usual replication mode used in a PostgreSQL cluster. We will use PostgreSQL 11 on CentOS 7.
PostgreSQL Installation
Following the PostgreSQL official installation guide, this task is pretty simple.
First, install the repository:
$ yum install https://download.postgresql.org/pub/repos/yum/reporpms/EL-7-x86_64/pgdg-redhat-repo-latest.noarch.rpmInstall the PostgreSQL client and server packages:
$ yum install postgresql11 postgresql11-serverInitialize the database:
$ /usr/pgsql-11/bin/postgresql-11-setup initdb

$ systemctl enable postgresql-11

$ systemctl start postgresql-11
On the standby node, you can avoid the last command (start the database service) as you will restore a binary backup to create the streaming replication.
Now, let’s see the configuration required by an asynchronous PostgreSQL replication.
Configuring Asynchronous PostgreSQL Replication
Primary Node Setup
In the PostgreSQL primary node, you must use the following basic configuration to create an Async replication. The files that will be modified are postgresql.conf and pg_hba.conf. In general, they are in the data directory (/var/lib/pgsql/11/data/) but you can confirm it on the database side:
postgres=# SELECT setting FROM pg_settings WHERE name = 'data_directory';

        setting

------------------------

 /var/lib/pgsql/11/data

(1 row)
Postgresql.conf
Change or add the following parameters in the postgresql.conf configuration file.
Here you need to add the IP address(es) where to listen on. The default value is ‘localhost’, and for this example, we’ll use ‘*’ for all IP addresses in the server.
listen_addresses = '*' Set the server port where to listen on. By default 5432.
port = 5432 Determine how much information is written to the WALs. The possible values are minimal, replica, or logical. The hot_standby value is mapped to replica and it is used to keep the compatibility with previous versions.
wal_level = hot_standby Set the max number of walsender processes, which manage the connection with a standby server.
max_wal_senders = 16Set the minimum amount of WAL files to be kept in the pg_wal directory.
wal_keep_segments = 32Changing these parameters requires a database service restart.
$ systemctl restart postgresql-11Pg_hba.conf
Change or add the following parameters in the pg_hba.conf configuration file.
# TYPE  DATABASE        USER ADDRESS                 METHOD

host  replication  replication_user  IP_STANDBY_NODE/32  md5

host  replication  replication_user  IP_PRIMARY_NODE/32  md5
As you can see, here you need to add the user access permission. The first column is the connection type, that can be host or local. Then, you need to specify database (replication), user, source IP Address and authentication method. Changing this file requires a database service reload.
$ systemctl reload postgresql-11You should add this configuration in both primary and standby nodes, as you will need it if the standby node is promoted to master in case of failure.
Now, you must create a replication user.
Replication Role
The ROLE (user) must have REPLICATION privilege to use it in the streaming replication.
postgres=# CREATE ROLE replication_user WITH LOGIN PASSWORD 'PASSWORD' REPLICATION;

CREATE ROLE
After configuring the corresponding files and the user creation, you need to create a consistent backup from the primary node and restore it on the standby node.
Standby Node Setup
On the standby node, go to the /var/lib/pgsql/11/ directory and move or remove the current datadir:
$ cd /var/lib/pgsql/11/

$ mv data data.bk
Then, run the pg_basebackup command to get the current primary datadir and assign the correct owner (postgres):
$ pg_basebackup -h 192.168.100.145 -D /var/lib/pgsql/11/data/ -P -U replication_user --wal-method=stream

$ chown -R postgres.postgres data
Now, you must use the following basic configuration to create an Async replication. The file that will be modified is postgresql.conf, and you need to create a new recovery.conf file. Both will be located in /var/lib/pgsql/11/.
Recovery.conf
Specify that this server will be a standby server. If it is on, the server will continue recovering by fetching new WAL segments when the end of archived WAL is reached.
standby_mode = 'on'Specify a connection string to be used for the standby server to connect to the primary node.
primary_conninfo = 'host=IP_PRIMARY_NODE port=5432 user=replication_user password=PASSWORD'Specify recovering into a particular timeline. The default is to recover along the same timeline that was current when the base backup was taken. Setting this to “latest” recovers to the latest timeline found in the archive.
recovery_target_timeline = 'latest'Specify a trigger file whose presence ends recovery in the standby.
trigger_file = '/tmp/failover_5432.trigger'Postgresql.conf
Change or add the following parameters in the postgresql.conf configuration file.
Determine how much information is written to the WALs. The possible values are minimal, replica, or logical. The hot_standby value is mapped to replica and it is used to keep the compatibility with previous versions. Changing this value requires a service restart.
wal_level = hot_standbyAllow the queries during recovery. Changing this value requires a service restart.
hot_standby = onStarting Standby Node
Now you have all the required configuration in place, you just need to start the database service on the standby node.
$ systemctl start postgresql-11And check the database logs in /var/lib/pgsql/11/data/log/. You should have something like this:
2019-11-18 20:23:57.440 UTC [1131] LOG:  entering standby mode

2019-11-18 20:23:57.447 UTC [1131] LOG:  redo starts at 0/3000028

2019-11-18 20:23:57.449 UTC [1131] LOG:  consistent recovery state reached at 0/30000F8

2019-11-18 20:23:57.449 UTC [1129] LOG:  database system is ready to accept read only connections

2019-11-18 20:23:57.457 UTC [1135] LOG:  started streaming WAL from primary at 0/4000000 on timeline 1
You can also check the replication status in the primary node by running the following query:
postgres=# SELECT pid,usename,application_name,state,sync_state FROM pg_stat_replication;

 pid  | usename      | application_name |   state | sync_state

------+------------------+------------------+-----------+------------

 1467 | replication_user | walreceiver      | streaming | async

(1 row)
As you can see, we are using an async replication.
Converting Asynchronous PostgreSQL Replication to Synchronous Replication
Now, it’s time to convert this async replication to a sync one, and for this, you will need to configure both the primary and the standby node.
Primary Node
In the PostgreSQL primary node, you must use this basic configuration in addition to the previous async configuration.
Postgresql.conf
Specify a list of standby servers that can support synchronous replication. This standby server name is the application_name setting in the standby’s recovery.conf file.
synchronous_standby_names = 'pgsql_0_node_0'synchronous_standby_names = 'pgsql_0_node_0'Specifies whether transaction commit will wait for WAL records to be written to disk before the command returns a “success” indication to the client. The valid values are on, remote_apply, remote_write, local, and off. The default value is on.
synchronous_commit = onStandby Node Setup
In the PostgreSQL standby node, you need to change the recovery.conf file adding the ‘application_name value in the primary_conninfo parameter.
Recovery.conf
standby_mode = 'on'

primary_conninfo = 'application_name=pgsql_0_node_0 host=IP_PRIMARY_NODE port=5432 user=replication_user password=PASSWORD'

recovery_target_timeline = 'latest'

trigger_file = '/tmp/failover_5432.trigger'
Restart the database service in both the primary and in the standby nodes:
$ service postgresql-11 restartNow, you should have your sync streaming replication up and running:
postgres=# SELECT pid,usename,application_name,state,sync_state FROM pg_stat_replication;

 pid  | usename      | application_name |   state | sync_state

------+------------------+------------------+-----------+------------

 1561 | replication_user | pgsql_0_node_0   | streaming | sync

(1 row)
Rollback from Synchronous to Asynchronous PostgreSQL Replication
If you need to go back to asynchronous PostgreSQL replication, you just need to rollback the changes performed in the postgresql.conf file on the primary node:
Postgresql.conf
#synchronous_standby_names = 'pgsql_0_node_0'

#synchronous_commit = on
And restart the database service.
$ service postgresql-11 restartSo now, you should have asynchronous replication again.
postgres=# SELECT pid,usename,application_name,state,sync_state FROM pg_stat_replication;

 pid  | usename      | application_name |   state | sync_state

------+------------------+------------------+-----------+------------

 1625 | replication_user | pgsql_0_node_0   | streaming | async

(1 row)
How to Deploy a PostgreSQL Synchronous Replication Using ClusterControl
With ClusterControl you can perform the deployment, configuration, and monitoring tasks all-in-one from the same job and you will be able to manage it from the same UI.
We will assume that you have ClusterControl installed and it can access the database nodes via SSH. For more information about how to configure the ClusterControl access please refer to our official documentation.
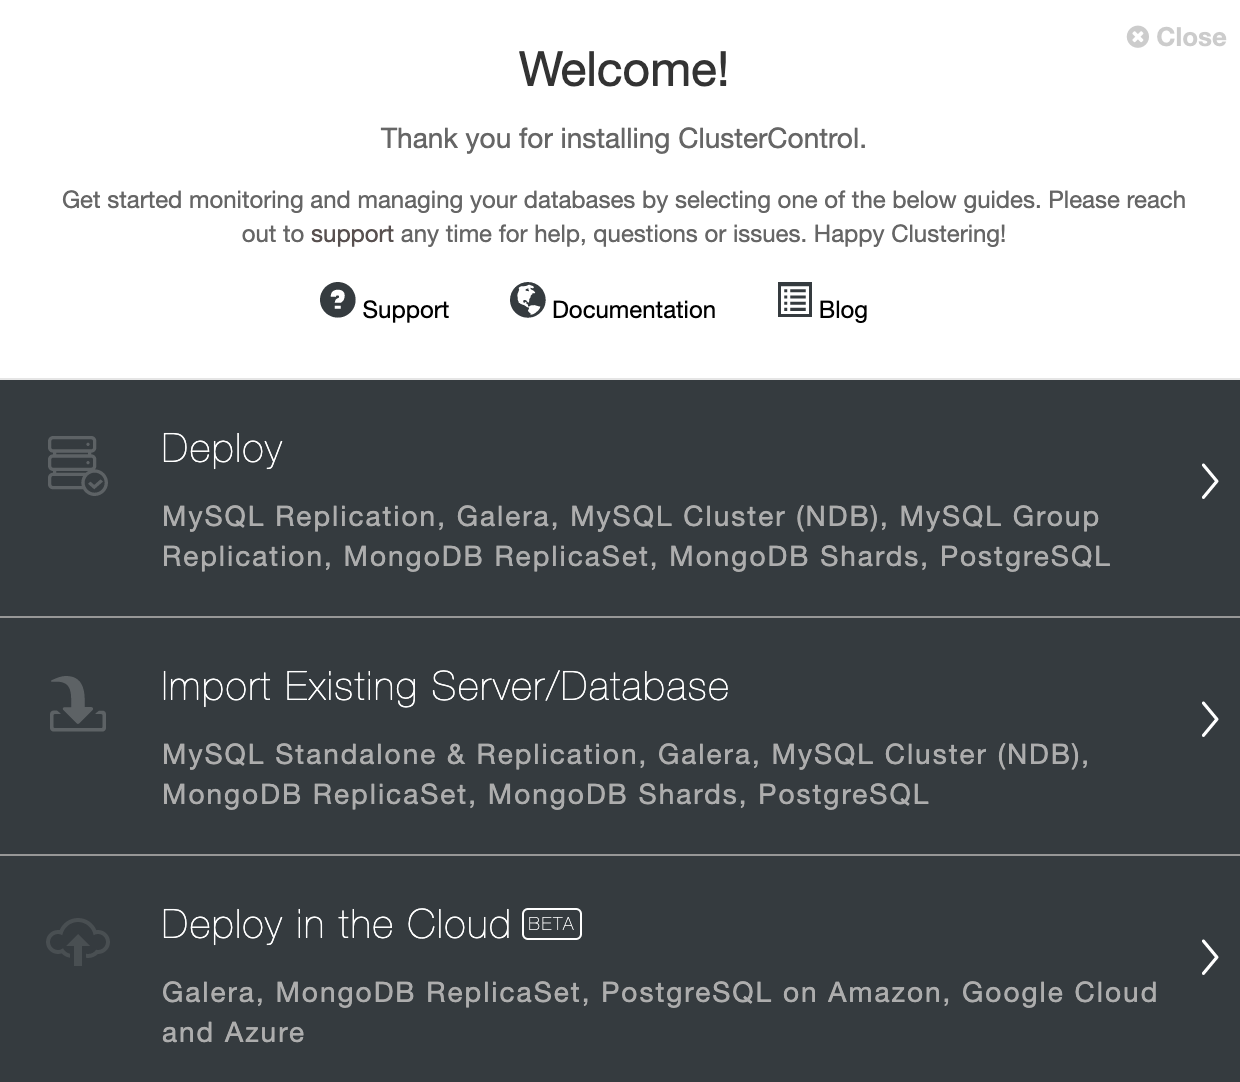
Go to ClusterControl and use the “Deploy” option to create a new PostgreSQL cluster.
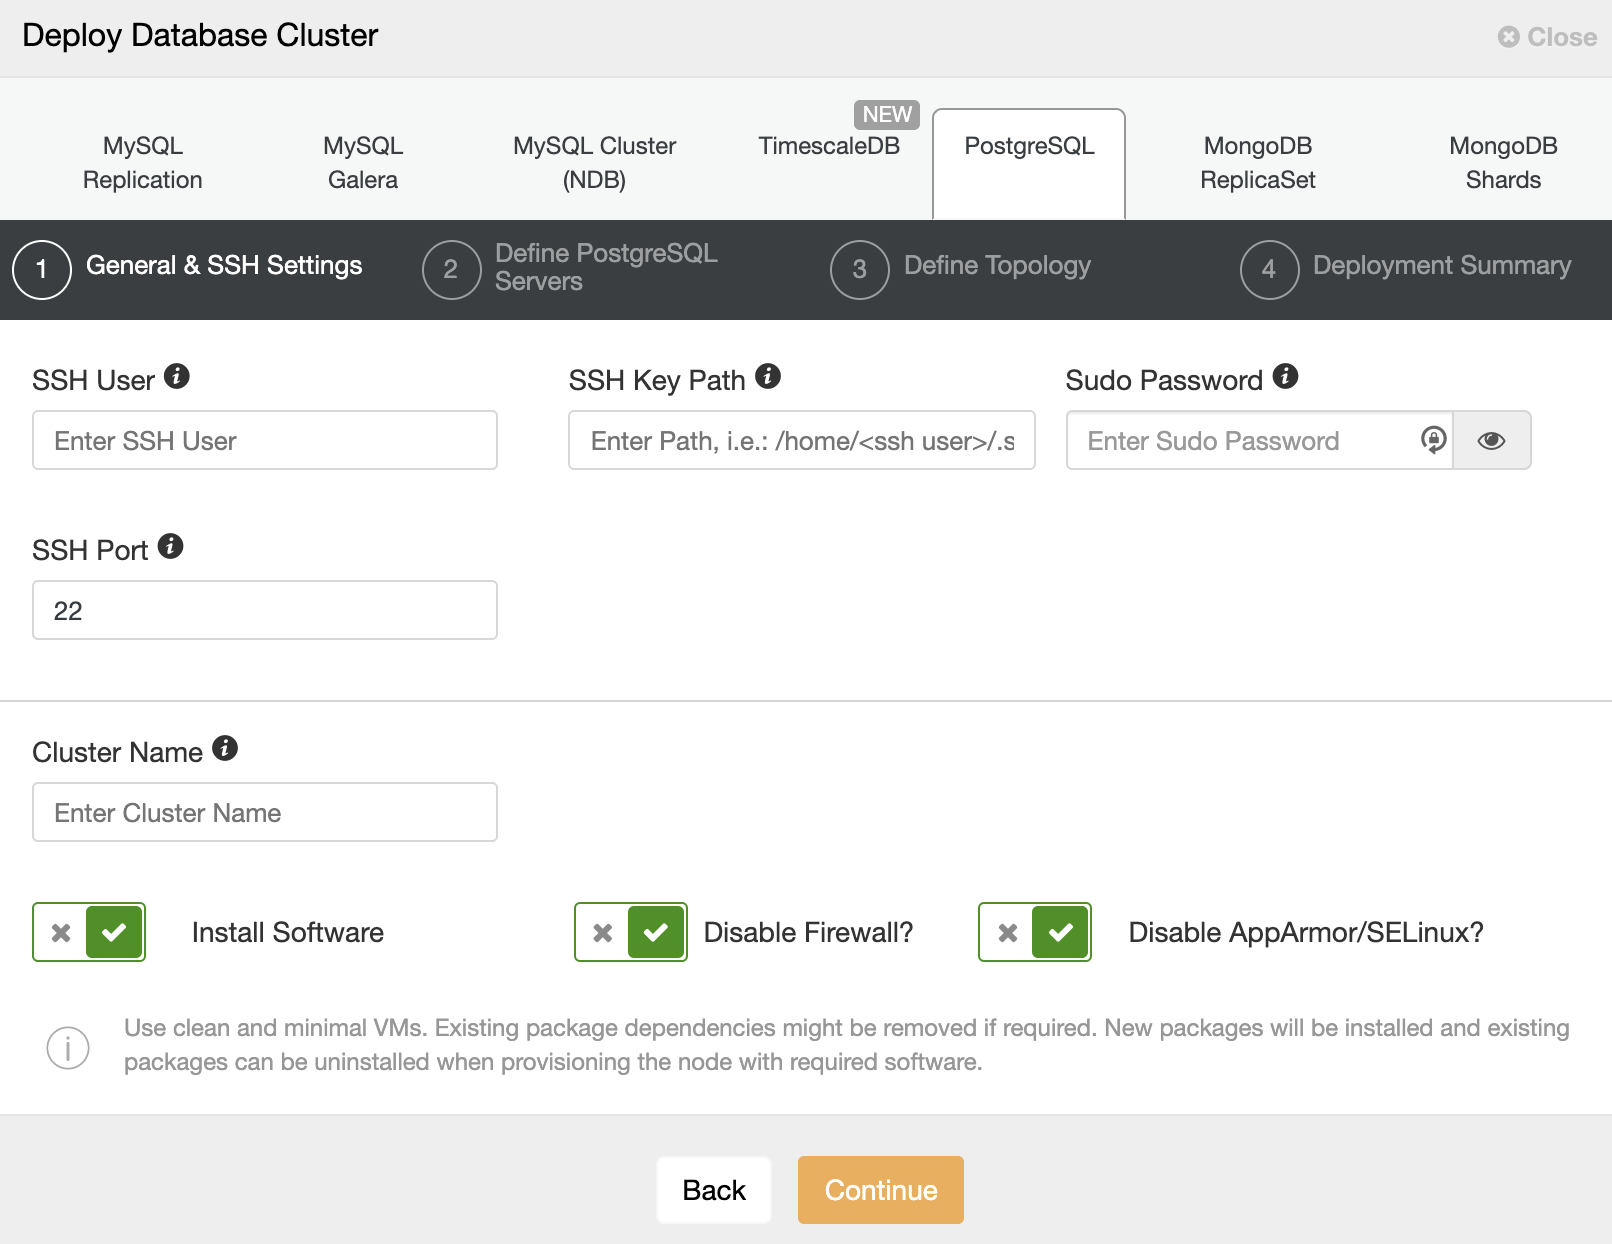
When selecting PostgreSQL, you must specify User, Key, or Password and a port to connect by SSH to our servers. You also need a name for your new cluster and if you want ClusterControl to install the corresponding software and configurations for you.
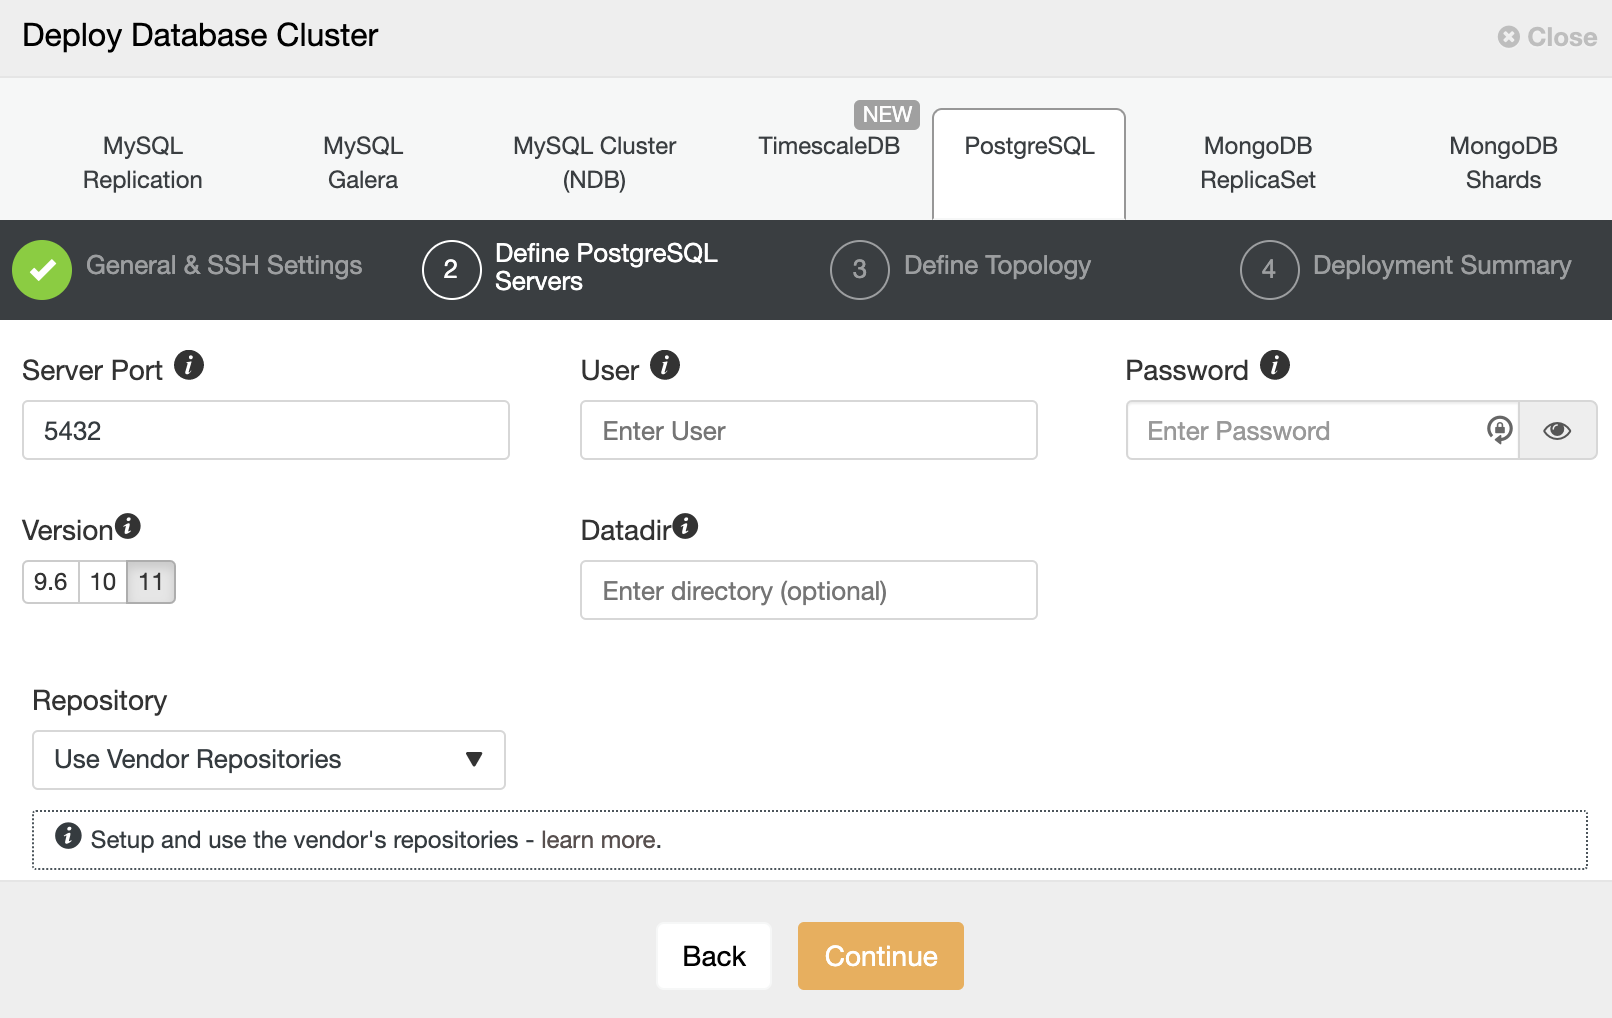
After setting up the SSH access information, you must enter the data to access your database. You can also specify which repository to use.
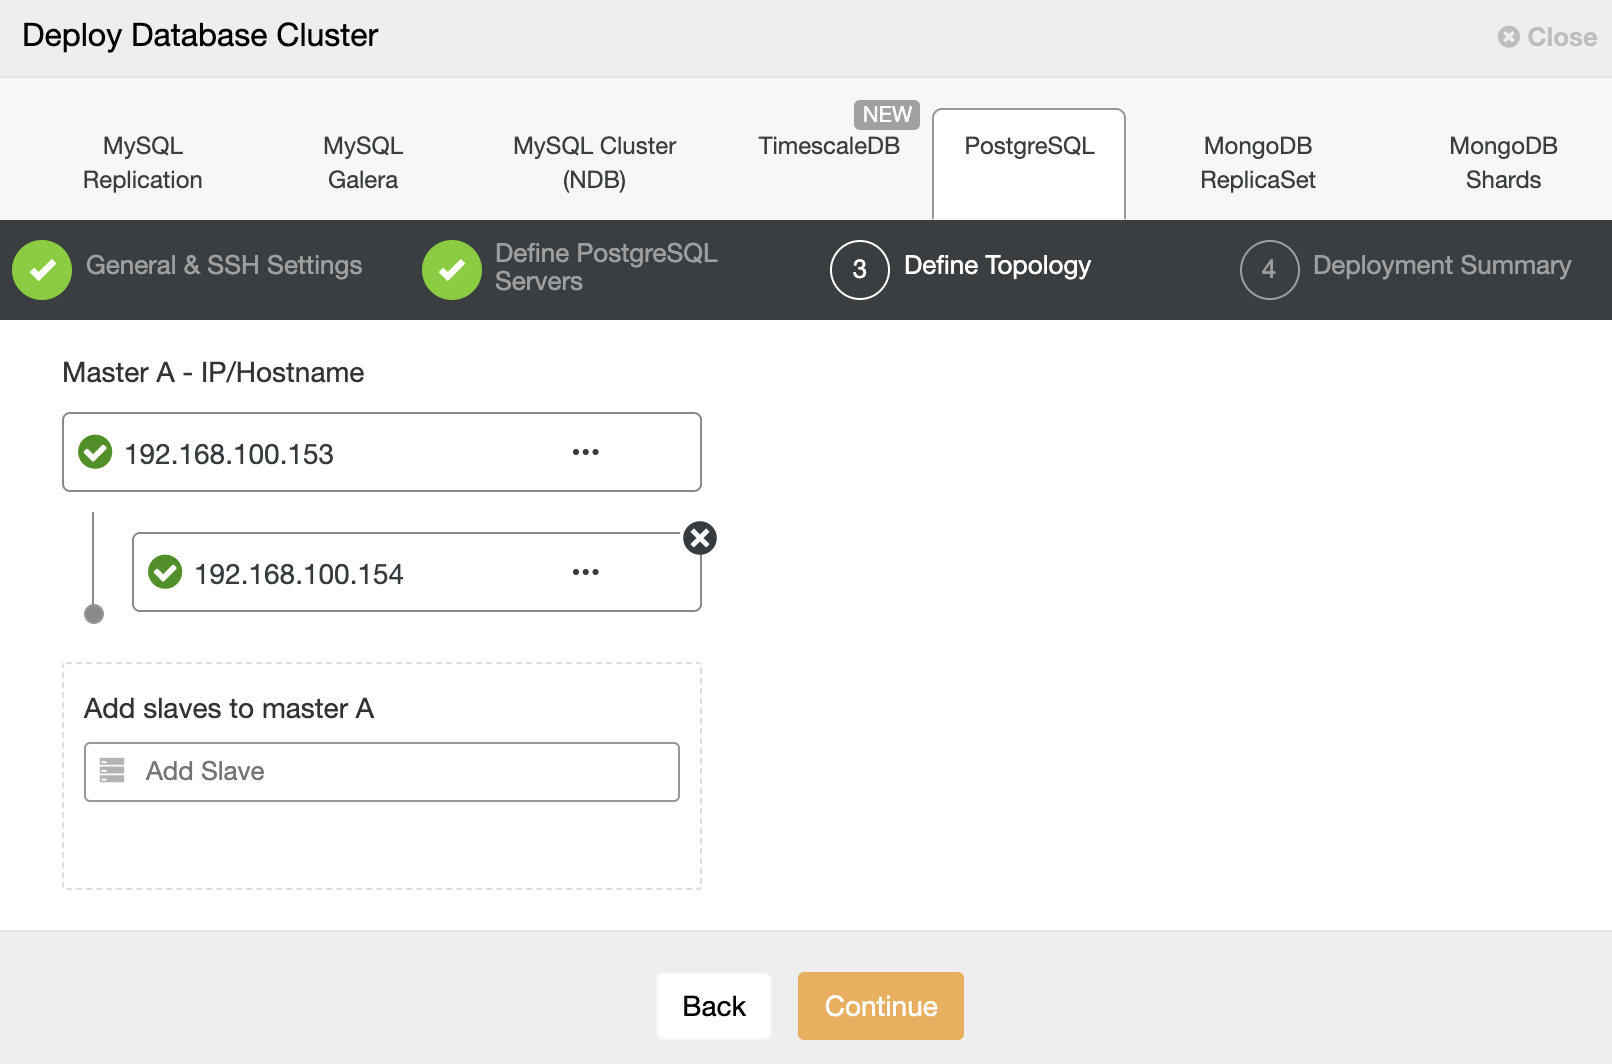
In the next step, you need to add your servers to the cluster that you are going to create. When adding your servers, you can enter IP or hostname.
And finally, in the last step, you can choose the replication method, which can be asynchronous or synchronous replication.
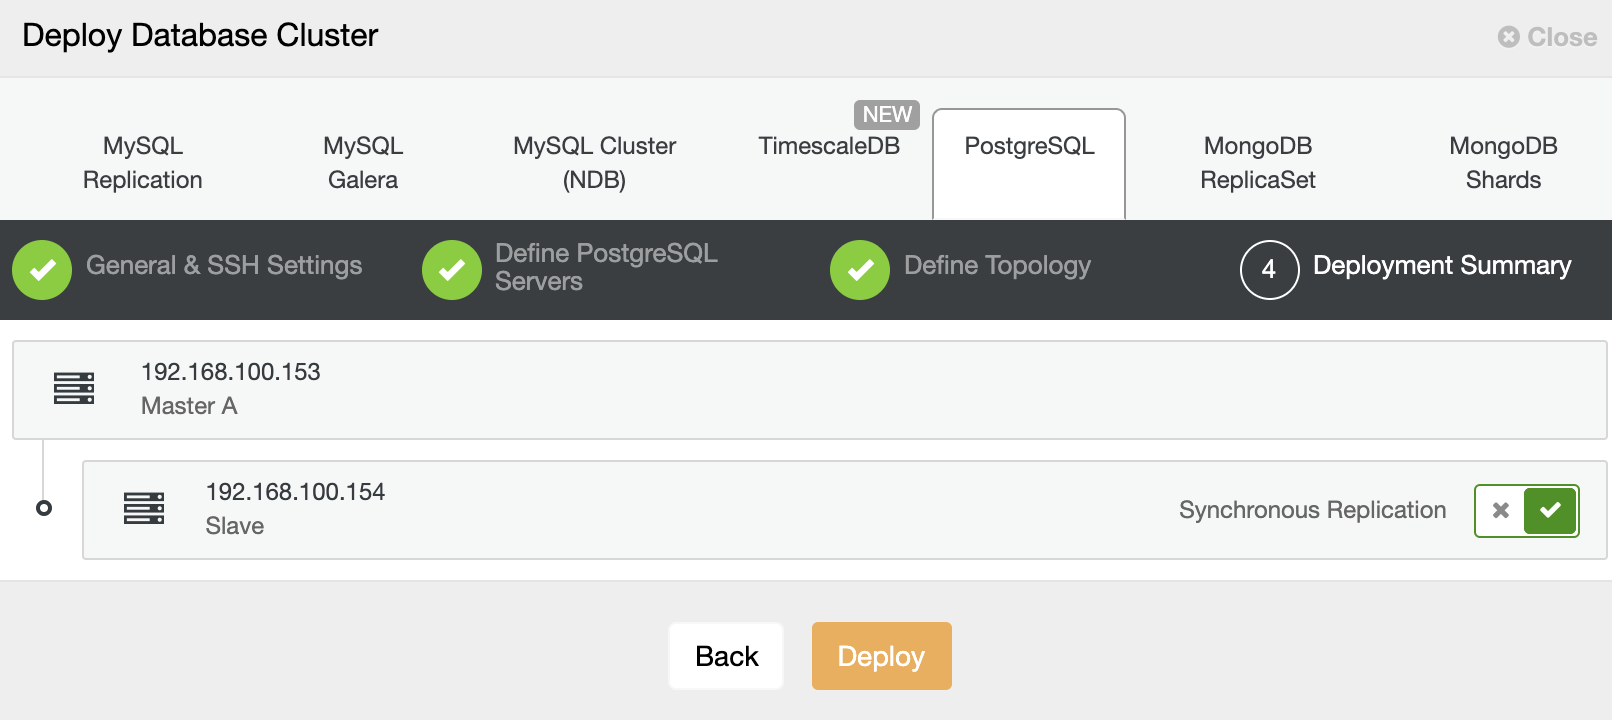
That’s it. You can monitor the job status in the ClusterControl activity section.
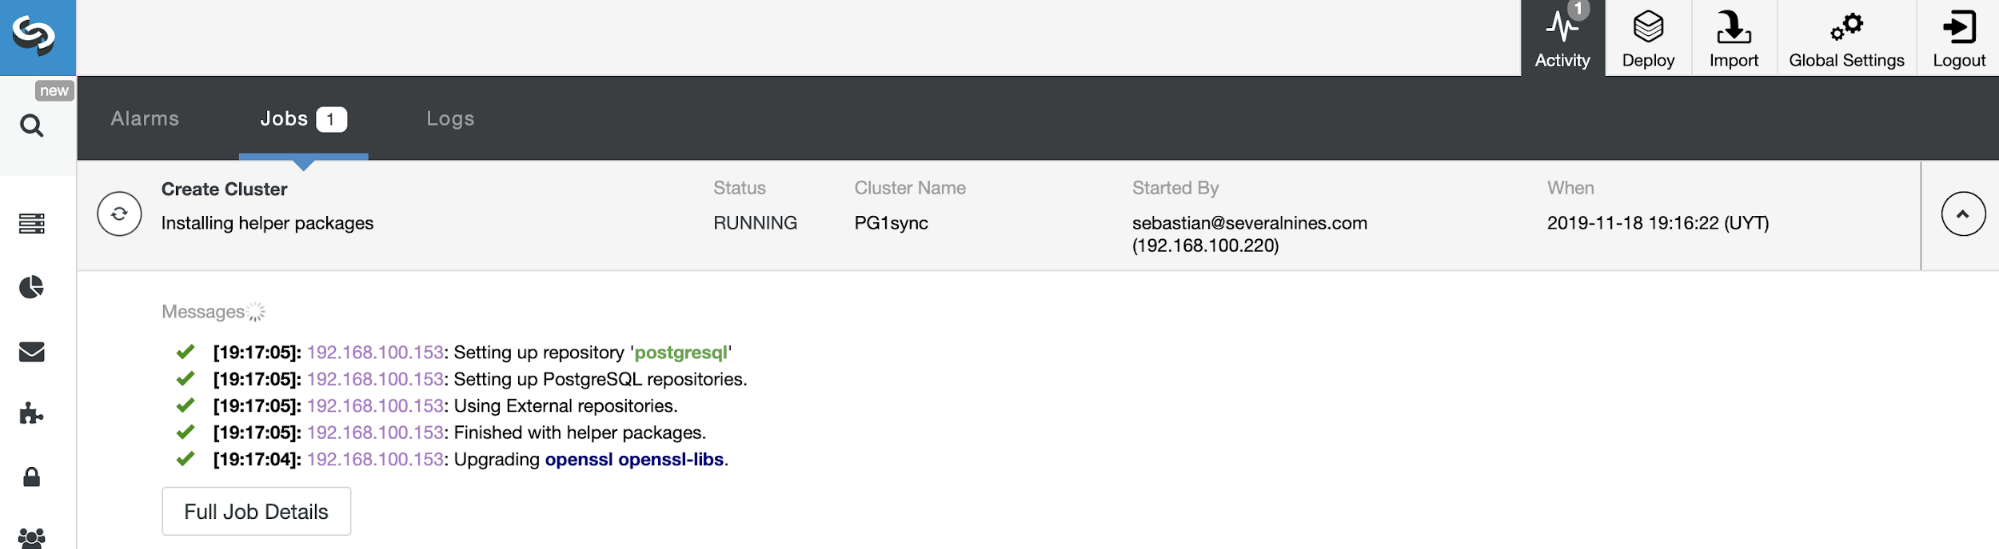
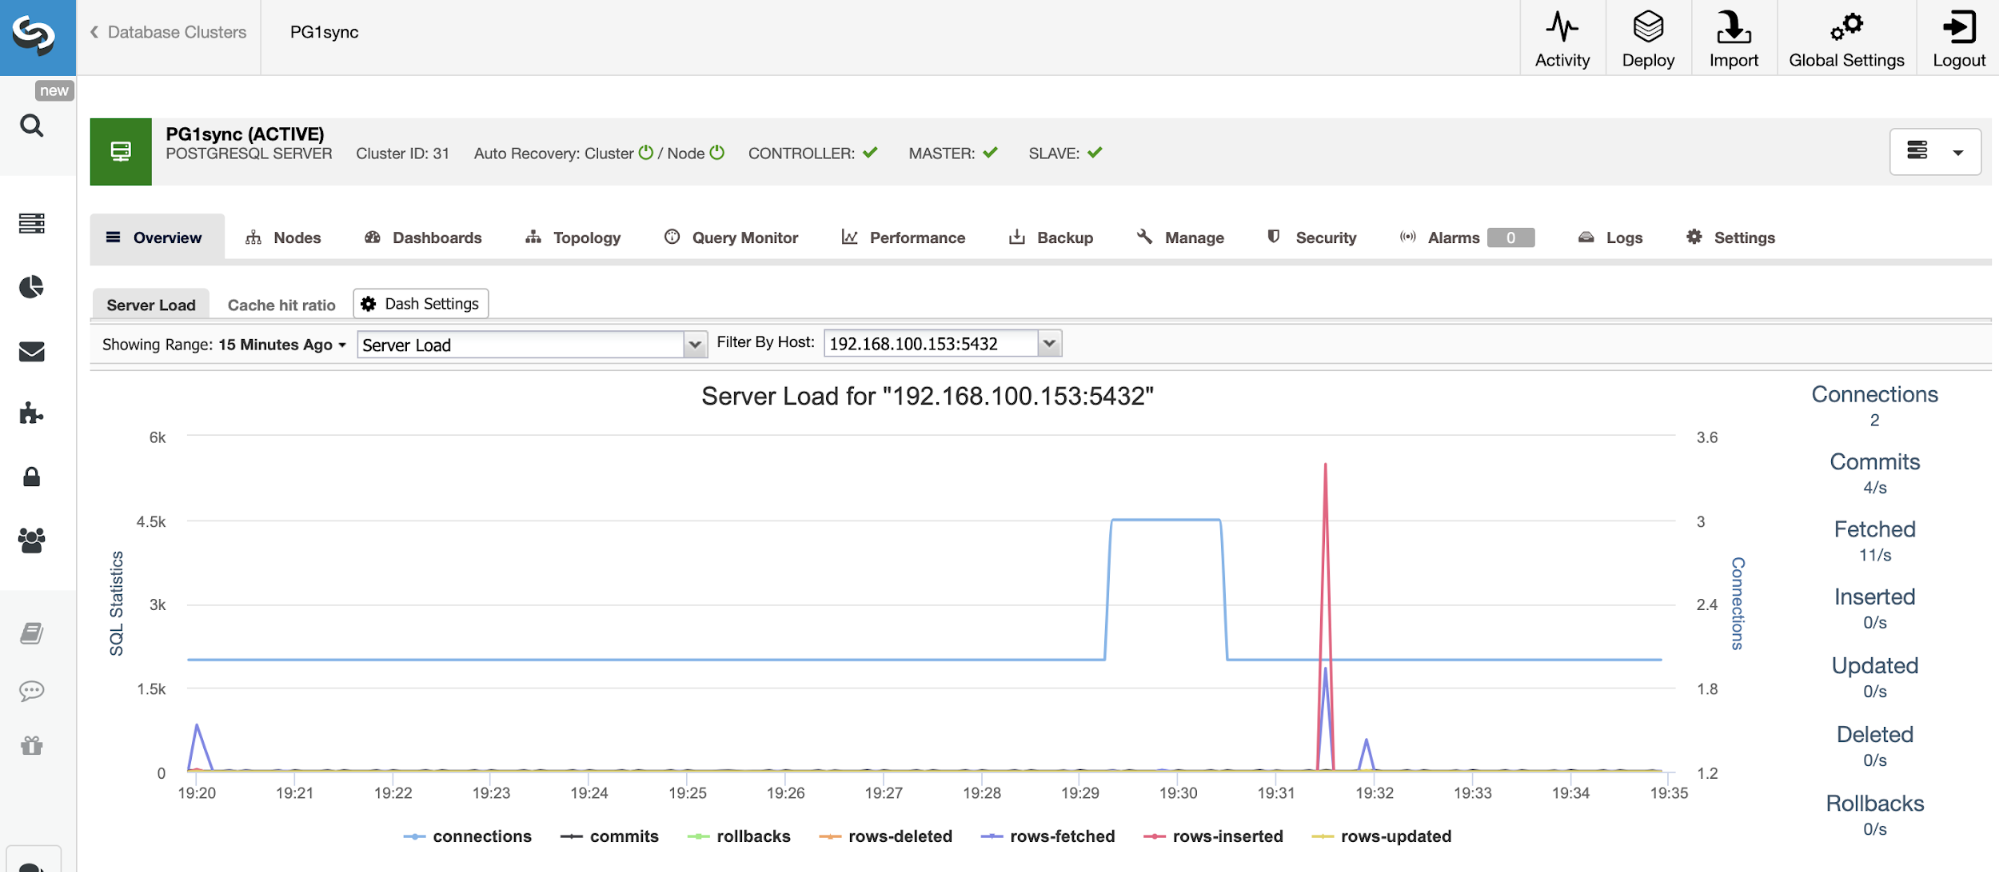
And when this job finishes, you will have your PostgreSQL synchronous cluster installed, configured and monitored by ClusterControl.
Conclusion
As we mentioned at the beginning of this blog, High Availability is a requirement for all companies, so you should know the available options to achieve it for each technology in use. For PostgreSQL, you can use synchronous streaming replication as the safest way to implement it, but this method doesn’t work for all environments and workloads.
Be careful with the latency generated by waiting for the confirmation of each transaction that could be a problem instead of a High Availability solution.