blog
How to Create a Single Endpoint for Your PostgreSQL Replication Setup using HAProxy

Managing traffic to the database can get harder and harder as it increases in amount and the database is actually distributed across multiple servers. PostgreSQL clients usually talk to a single endpoint. When a primary node fails, the database clients will keep retrying the same IP. In case you have failed over to a secondary node, the application needs to be updated with the new endpoint. This is where you would want to put a load balancer between the applications and the database instances. It can direct applications to available/healthy database nodes and failover when required. Another benefit would be to increase read performance by using replicas effectively. It is possible to create a read-only port that balances reads across replicas. In this blog, we will cover HAProxy. We’ll see what is, how it works and how to deploy it for PostgreSQL.
What is HAProxy?
HAProxy is an open source proxy that can be used to implement high availability, load balancing and proxying for TCP and HTTP based applications.
As a load balancer, HAProxy distributes traffic from one origin to one or more destinations and can define specific rules and/or protocols for this task. If any of the destinations stops responding, it is marked as offline, and the traffic is sent to the rest of the available destinations.
How to install and configure HAProxy manually
To install HAProxy on Linux you can use the following commands:
On Ubuntu/Debian OS:
$ apt-get install haproxy -yOn CentOS/RedHat OS:
$ yum install haproxy -yAnd then we need to edit the following configuration file to manage our HAProxy configuration:
$ /etc/haproxy/haproxy.cfgConfiguring our HAProxy is not complicated, but we need to know what we are doing. We have several parameters to configure, depending on how we want HAProxy to work. For more information, we can follow the documentation about the HAProxy configuration.
Let’s look at a basic configuration example. Suppose that you have the following database topology:
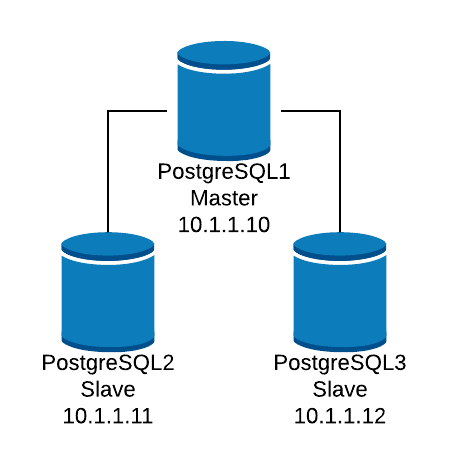
We want to create a HAProxy listener to balance the read traffic between the three nodes.
listen haproxy_read
   bind *:5434
   balance     roundrobin
   server  postgres1 10.1.1.10:5432 check
   server  postgres2 10.1.1.11:5432 check
   server  postgres3 10.1.1.12:5432 check
As we mentioned before, there are several parameters to configure here, and this configuration depends on what we want to do. For example:
listen  haproxy_read
       bind *:5434
       mode tcp
       timeout client  10800s
       timeout server  10800s
       tcp-check expect string is running
       balance leastconn
       option tcp-check
       default-server port 9201 inter 2s downinter 5s rise 3 fall 2 slowstart 60s maxconn 64 maxqueue 128 weight 100
       server  postgres1 10.1.1.10:5432 check
       server  postgres2 10.1.1.11:5432 check
       server  postgres3 10.1.1.12:5432 check
How HAProxy works on ClusterControl
For PostgreSQL, HAProxy is configured by ClusterControl with two different ports by default, one read-write and one read-only.

In our read-write port, we have our master server as online and the rest of our nodes as offline, and in the read-only port, we have both the master and the slaves online.
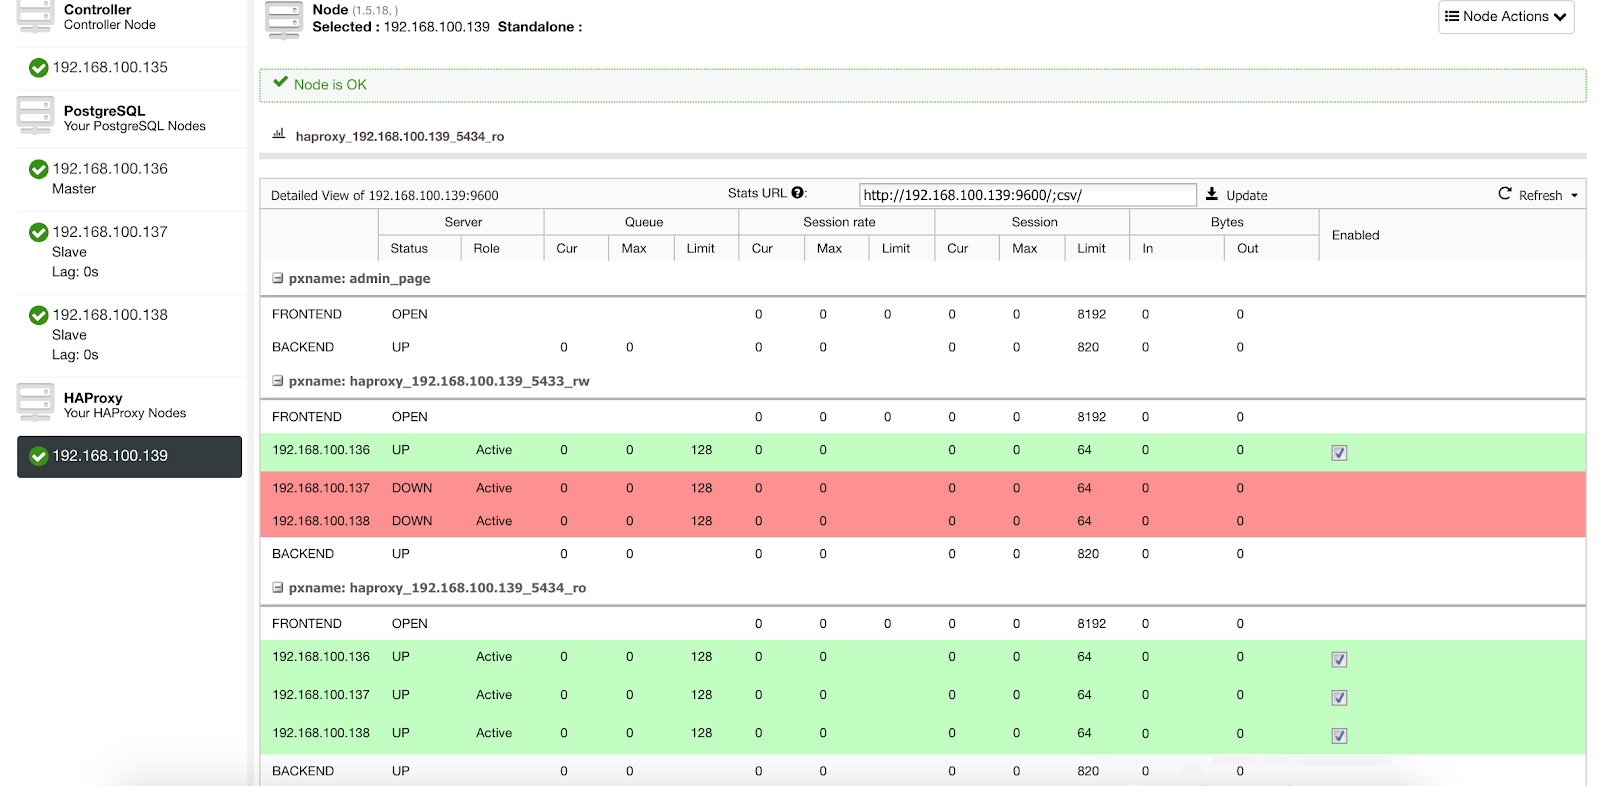
When HAProxy detects that one of our nodes, either master or slave, is not accessible, it automatically marks it as offline and does not take it into account when sending traffic. Detection is done by healthcheck scripts that are configured by ClusterControl at the time of deployment. These check whether the instances are up, whether they are undergoing recovery, or are read-only.
When ClusterControl promotes a slave to master, our HAProxy marks the old master as offline (for both ports) and puts the promoted node online (in the read-write port).
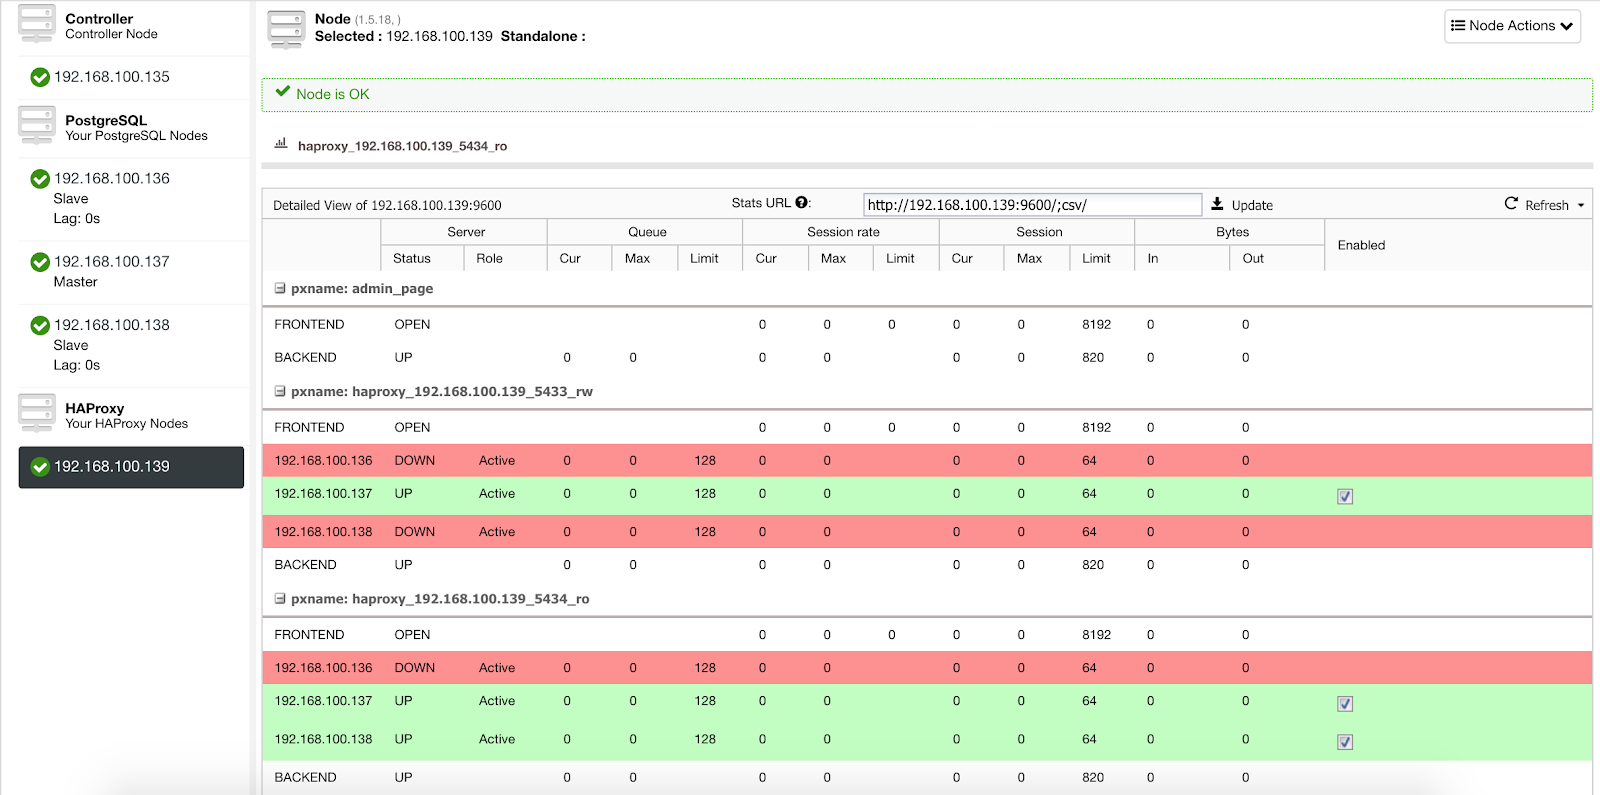
In this way, our systems continue to operate normally and without our intervention.
How to deploy HAProxy with ClusterControl
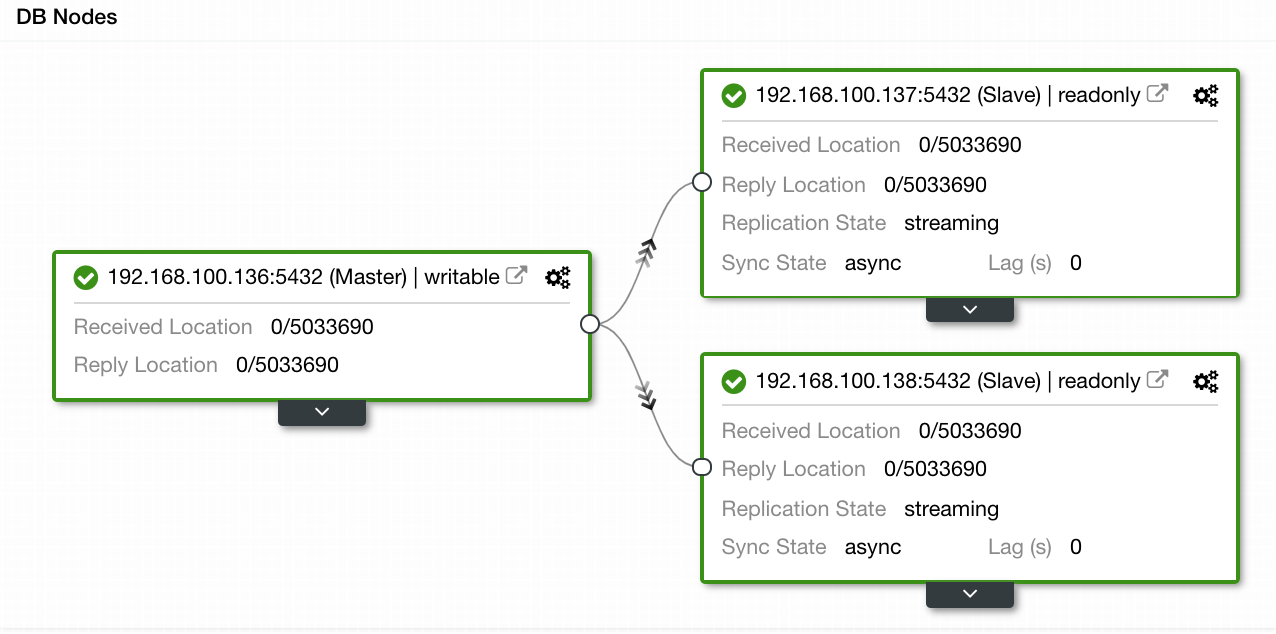
In our example, we created an environment with 1 master and 2 slaves – see a screenshot of the Topology View in ClusterControl. We’ll now add our HAProxy load balancer.
For this task we need to go to ClusterControl -> PostgreSQL Cluster Actions -> Add Load Balancer

Here we must add the information that ClusterControl will use to install and configure our HAProxy load balancer.
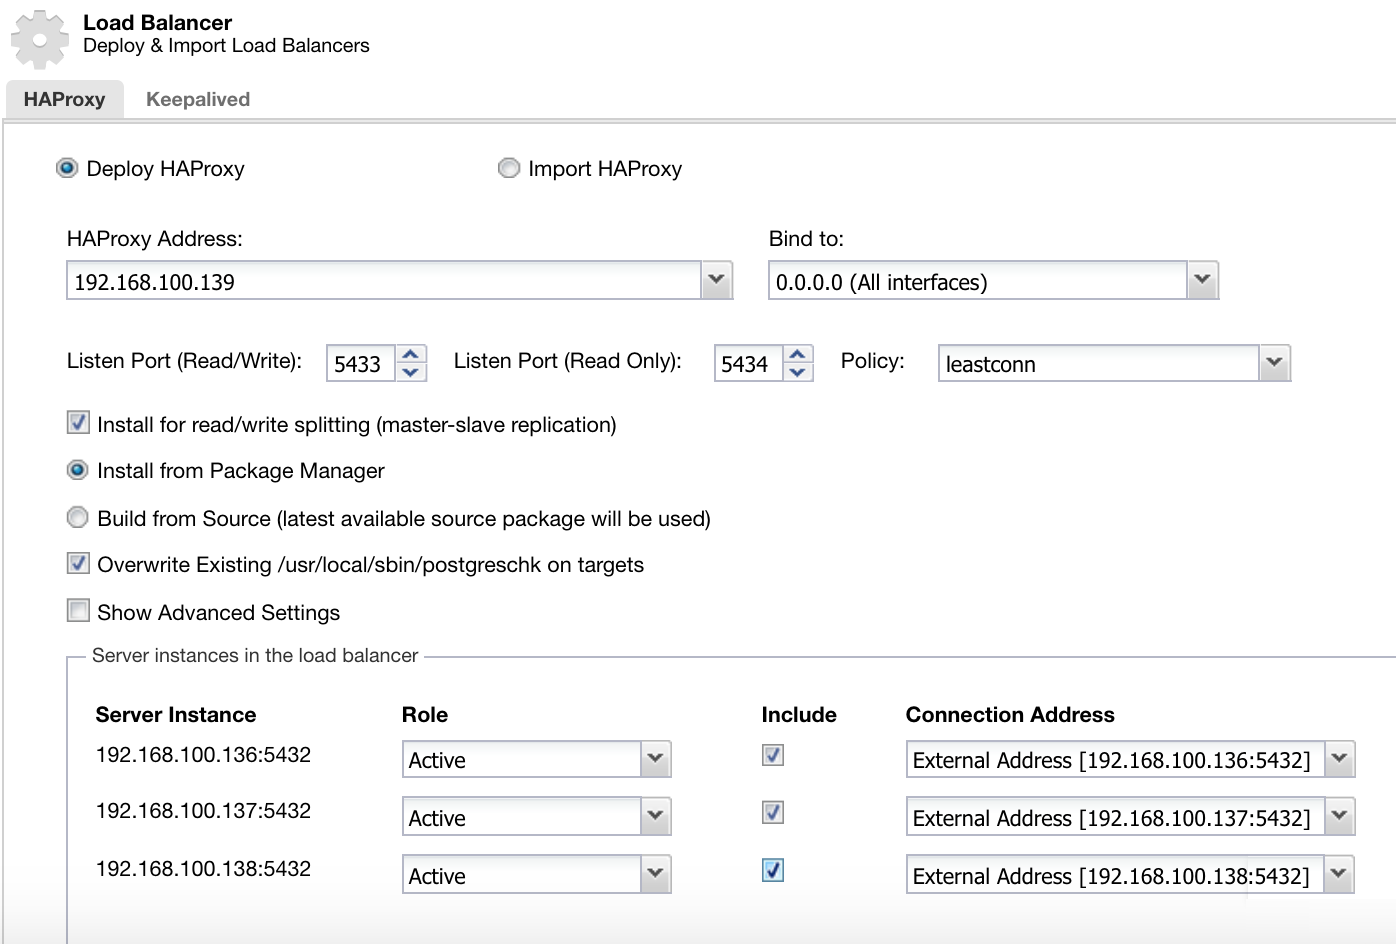
The information that we need to introduce is:
Action: Deploy or Import.
HAProxy Address: IP Address for our HAProxy server.
Bind to: Interface or IP Address where HAProxy will listen.
Listen Port (Read/Write): Port for read/write mode.
Listen Port (Read Only): Port for read only mode.
Policy: It can be:
- leastconn: The server with the lowest number of connections receives the connection.
- roundrobin: Each server is used in turns, according to their weights.
- source: The source IP address is hashed and divided by the total weight of the running servers to designate which server will receive the request.
Install for read/write splitting: For master-slave replication.
Source: We can choose Install from a package manager or build from source.
Overwrite existing postgreschk on targets.
And we need to select which servers you want to add to the HAProxy configuration and some additional information like:
Role: It can be Active or Backup.
Include: Yes or No.
Connection address information.
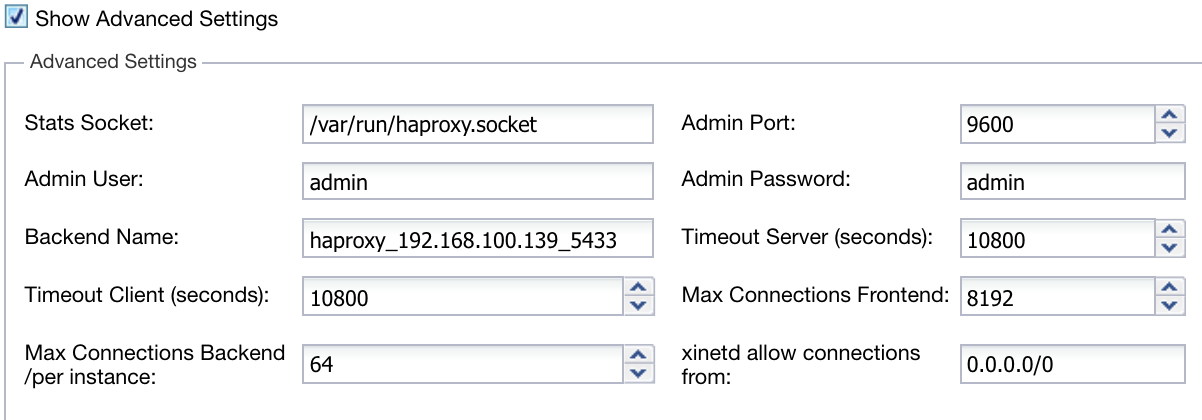
Also, we can configure Advanced Settings like Admin User, Backend Name, Timeouts, and more.
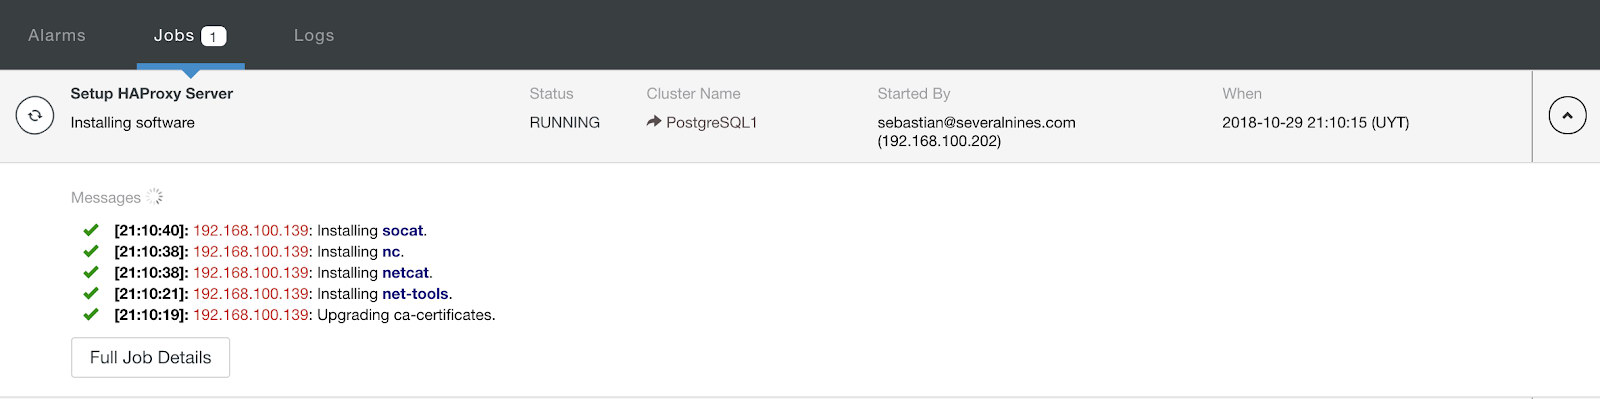
When you finish the configuration and confirm the deploy, we can follow the progress in the Activity section on ClusterControl UI.
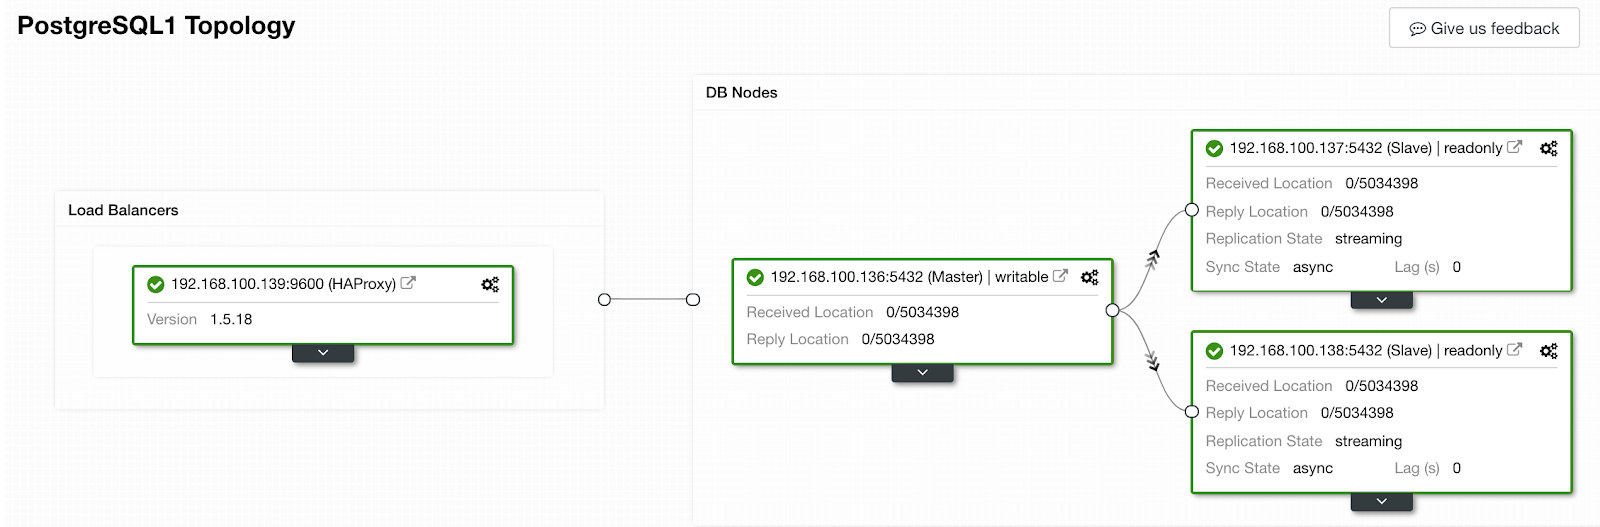
When it’s finished, we should have the following topology:
We can improve our HA design adding a new HAProxy node and configuring Keepalived service between them. All this can be performed by ClusterControl. For more information, you can check our previous blog about PostgreSQL and HA.
Using ClusterControl CLI to add a HAProxy Load Balancer
Also known as s9s-tools, this optional package was introduced in ClusterControl version 1.4.1, which contains a binary called s9s. It is a command line tool to interact, control and manage your database infrastructure using ClusterControl. The s9s command line project is open source and can be found on GitHub.
Starting from version 1.4.1, the installer script will automatically install the package (s9s-tools) on the ClusterControl node.
ClusterControl CLI opens a new door for cluster automation where you can easily integrate it with existing deployment automation tools like Ansible, Puppet, Chef or Salt.
Let’s look at an example of how to create a HAProxy load balancer with IP Address 192.168.100.142 on cluster ID 1:
[root@CC1 ~]# s9s cluster --add-node --cluster-id=1 --nodes="haproxy://192.168.100.142" --wait
Add HaProxy to Cluster
/ Job  7 FINISHED   [██████████] 100% Job finished.
And then we can check all of our nodes from the command line:
[root@CC1 ~]# s9s node --cluster-id=1 --list --long
STAT VERSION    CID CLUSTER     HOST            PORT COMMENT
coC- 1.7.0.2832   1 PostgreSQL1 192.168.100.135 9500 Up and running.
poS- 10.5         1 PostgreSQL1 192.168.100.136 5432 Up and running.
poM- 10.5         1 PostgreSQL1 192.168.100.137 5432 Up and running.
poS- 10.5         1 PostgreSQL1 192.168.100.138 5432 Up and running.
ho-- 1.5.18       1 PostgreSQL1 192.168.100.142 9600 Process 'haproxy' is running.
Total: 5
For more information about s9s and how to use it, you can check the official documentation or this how to blog of this topic.
Conclusion
In this blog, we have reviewed how HAProxy can help us to manage the traffic coming from the application into our PostgreSQL database. We checked how it can be manually deployed and configured, and then saw how it can be automated with ClusterControl. In order to avoid HAProxy becoming a single point of failure (SPOF), make sure you deploy at least two HAProxy instances and implement something like Keepalived and Virtual IP on top of them.