How we upgraded 1500 Postgres clusters to PG 10
The Challenge
Upgrade approximately 1500 Postgres database clusters from version 9.3 to 10, in 6 data centres, with sizes ranging from ~1GB to 500+GB within a downtime window of 15 minutes (with a 30 minute outside maximum). Total size of all clusters was approximately 55TB. Almost all the database servers were virtual machines, running Linux, with various combinations of physical resources allocated to them (memory, CPU, disk). Every facet of the upgrade had to be executed programatically, with no manual steps, and must not exceed the stated maintenance window. Additionally, upgrades must be performed with minimal measurable storage I/O and network impact, to reduce any “noisy neighbour” impact to other VM’s.
Note to readers: The upgrade steps for the “upgrade-from" Postgres version in this document should be nearly identical for all versions of Postgres from 9.2 - 9.6 (not just Postgres 9.3 which was the version we upgraded from). That being said, if these steps are going to be followed in production, test each one first to ensure they are complete, and correct, in your environment.
The usual disclaimers apply: we are not liable or responsible if anyone chooses to follow these steps and bad things happen.
Special thanks to the other members of our team, Mike Bennett and Doug Gorley. Mike was the team lead, project manager, and juggler of too many meetings. He did a phenomenal job of coordinating the work and keeping the project on track, and successfully managed expectations at every step of the process. Doug was the primary developer/automator/DevOps person and wrote all the Python and Jenkins jobs to link and execute the tasks. The third core member of the PG10 upgrade trio was Bricklen Anderson, the Postgres DBA and the designer/architect of the project.
As with any major undertaking, it takes many people to design, implement, test, and execute a significant project and this one was no different. There are too many to name, but I’d to thank the many contributors that ensured this project was a success, including the QA team (especially the indefatigable QA Architect, Deepa Guna), Customer Support, Engineering Support, and IT Operations.
Topology
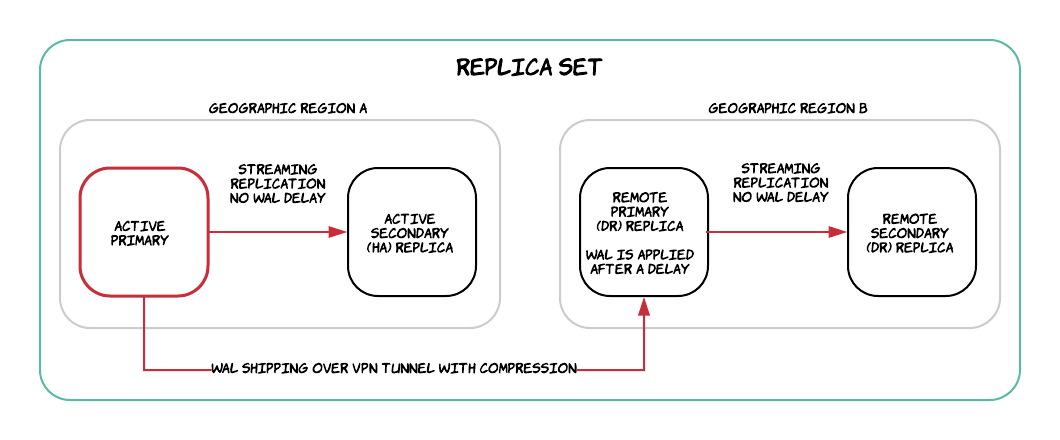
We’ll call the primary production Postgres cluster and its associated hot standbys a replica set, since a database “cluster” in Postgres terminology refers to “a collection of databases that is managed by a single instance of a running database server”. Our replica sets typically consist of a primary and three hot standby servers spread across data centres in multiple geographic regions of North America, EMEA, and APAC.
The Plan
To start, we had to come up with a plan to accomplish the upgrades within the short maintenance window, with no room for failures that could violate the outage window agreement. Here is how we approached this:
- Define the working parameters, be clear on the goals, and brainstorm about all the failure cases we could conceive of.
- Define the upgrade process itself. This included the
active primaryall the way through to theremote secondaryreplica. - Determine all services that can access the databases, and test the impact of the Postgres major version upgrade in our dev and staging environments. This included the many micro-services, upgrading to the newest JDBC version, connection poolers, various monitoring tools, internal reporting tools, and catching and fixing any differences between dev, test, staging, and production environments. JDBC turned out to be an important thing to test; we discovered that one service was relying on deprecated functionality in JDBC, and we needed to make some changes in the configuration to get it work properly after the upgrade. It took some time to track down, so testing well in advance was important.
- Determine the new PG 10 settings we wanted or needed to implement, including any changes to deprecated views, tables, and functions. We will be using Logical Replication in the future, so a few changes to the
postgresql.confwere also necessary. - Test the new settings thoroughly in the many dev, test, and staging environments, which included extensive soak testing.
- Document the steps we expected to execute.
- Test the process we came up with.
- Fix the docs, tweak the steps, then work with the Engineering team to get all changes we needed looped back into our application and various micro-services.
- Put the steps into a Jenkins pipeline to execute.
- Test, find problems, fix. Lather, rinse, repeat.
Execution of the Plan
Note: The actual steps were all executed using Jenkins pipelines, which allowed us to execute the upgrades programatically and in parallel, and logged all output in a usable fashion.
This document shows the steps and the commands that are not Jenkins-specific, and have been sanitized to be much less specific to our environments, with the intention that others may benefit from the commands listed in this doc.
🎉 Allow me to take a moment to give well-deserved shout-out to our QA team, who did an enormous amount of testing prior to going live with this huge project - it was critical work, and proved its value in the near-flawless upgrades we conducted.
The steps in this document assume the following settings (change to suit your env):
PGBASEDIR=/var/lib/pgsql
PGDATA=${PGBASEDIR}/data # same as PGDATAOLD
PGDATAOLD=${PGBASEDIR}/data
PGDATANEW=${PGBASEDIR}/data10
PGBINOLD=/usr/pgsql-9.3/bin
PGBINNEW=/usr/pgsql-10/bin
PGPORT=5432
All steps are executed as the postgres OS user unless otherwise noted.
Alright, it's time for the nitty gritty, the Postgres upgrade steps themselves…
1. Determine the Hosts
For every replica set, determine the IP or host address for each database cluster, and their functions. As mentioned, our servers function as:
active primaryactive secondaryremote primaryremote secondary
2. Pre-upgrade settings
If there are jobs that may run or could run when the start of the scheduled maintenance window commences, they should be prevented from starting.
Note: Execute this step up to a few hours before your window, so there is no chance of a job starting before the window and running long.
For example, if database backups commonly take two hours to run, create a do_not_execute_backup file on the database servers four hours in advance, and in your scheduling service (eg. cron) check for the existence of that file. If found, do not execute the backup.
# Example cron entry.
# Only execute the command if the flag does not exist.
0 7,17,23 * * * [ ! -e '/path/to/do_not_execute.flag' ] && /path/to/backup_script.sh
This would also apply to any other tasks that might run during the upgrade. For example, ETL, long-running reports, scheduled maintenance tasks, or other business-specific jobs.
If any notice must be given to clients and stakeholders well in advance, now is a good time to do that.At some point between now and the start of the outage window, you could take bootstrap backups of databases to be upgraded. This is one of several methods to meet RPO’s, and these occur before and after the PG 10 upgrades. In our case a “bootstrap backup” is a fast, minimal backup of all the tables that are critical to the core business. These backups answer the question “What data is necessary to get clients back up and running again with critical functionality?”. They could be exported as plain-text backups for maximum portability between Postgres versions (not critical, but sensible).
3. Pause alerting
For each alerting application you are using, pause the alerting capabilities prior to continuing. For example, if you are using Pingdom, Sensu, and xMatters, execute the relevant API calls to prevent any page-outs for the hosts you are working on.
4. Set Facts
User: sudo
We are using Puppet’s Facter to track the server-and-role-specific details (aka “facts”) on the servers, and the states that our micro-services and tooling depend on. At the start of the process we set a Fact called pg10_upgrade_in_progress to true. Any services that have been configured to read that file will know to follow the appropriate branch of operations if the upgrade process is in flight.
5. Install the version of Postgres you are going to upgrade to (PG10)
User: sudo
Choose the PGDG package that corresponds to your linux distribution.
Because our environments run a mix of RedHat/CentOS 6 and 7, different packages were needed for each distribution and version. We installed the rpms using rpm -Uvh rather than via yum because we needed to control the exact packages and actions (no side-effects), though that required we install packages in a specific order to satisfy dependencies.
Tip: To save time and bandwidth during the upgrades, download the packages ahead of time and save them to a location accessible to the database servers within the LAN. Note: Be sure to verify the checksums of each package if you are building from source.
RHEL/Centos 6 https://download.postgresql.org/pub/repos/yum/10/redhat/rhel-6-x86_64/libicu packages: http://mirror.centos.org/centos/6/os/x86_64/Packages/
RHEL/Centos 7 https://download.postgresql.org/pub/repos/yum/10/redhat/rhel-7-x86_64/
libicu packages: http://mirror.centos.org/centos/7/os/x86_64/Packages/
Packages to install
# Note that the order is important (because of dependencies) if using "rpm -Uvh"
libicu.x86_64
libicu-devel.x86_64

postgresql10-libs.x86_64
postgresql10.x86_64
postgresql10-server.x86_64
postgresql10-debuginfo.x86_64
postgresql10-contrib.x86_64
postgresql10-devel.x86_64
pg_catcheck10.x86_64
amcheck_next10.x86_64
Installation commands
# For example, for CentOS 7
# Supply paths to where the rpms are
sudo rpm -Uvh pgdg-centos10-10-2.noarch.rpm  # Change this to correct pgdg rpm
sudo rpm -Uvh libicu-50.1.2-15.el7.x86_64.rpm
sudo rpm -Uvh libicu-devel-50.1.2-15.el7.x86_64.rpm
sudo rpm -Uvh postgresql10-10.1-1PGDG.rhel7.x86_64.rpm
sudo rpm -Uvh postgresql10-contrib-10.1-1PGDG.rhel7.x86_64.rpm
sudo rpm -Uvh postgresql10-debuginfo-10.1-1PGDG.rhel7.x86_64.rpm
sudo rpm -Uvh postgresql10-devel-10.1-1PGDG.rhel7.x86_64.rpm
sudo rpm -Uvh postgresql10-libs-10.1-1PGDG.rhel7.x86_64.rpm
sudo rpm -Uvh postgresql10-server-10.1-1PGDG.rhel7.x86_64.rpm
sudo rpm -Uvh amcheck_next10-1.3-1.rhel7.x86_64.rpm
6. Set outage window
- Alert any customers or stakeholders that the downtime is about to commence.
- Stop any micro-services or applications that are talking to the database server you are about to upgrade.
- Optionally set up 503 HTTP codes and haproxy redirects to give a clean front to clients, and for applications to take advantage of the 503 HTTP error codes.
7. Block database server access
User: sudo
Status of Postgres on servers in replica set:
active primary=UP, active secondary=UP, remote primary=UP, remote secondary=UP
This is the start of the true outage window. How this is done depends on your environment. In our case, a local firewall rule on the db server was the most effective and simplest method to prevent interruptions to the upgrade. If server access is required, but only access to the Postgres cluster must be regulated, then selectively updating the pg_hba.conf will work until the PG 9.3 cluster is stopped.
Be aware that access to the PG10 cluster will be allowed as soon as Postgres is started after the upgrade, unless you make the same (blocking) pg_hba.conf settings to the PG10 pg_hba.conf
iptables block server access:
sudo iptables -I INPUT -j DROP -p tcp --destination-port ${PGPORT} -i eth0
8. Back up Postgres 9.3 config files
User: postgres
# Make a backup directory about the $PGDATAOLD directory
mkdir -p ${PGBASEDIR}/confbkp

# Copy over the conf files with a new file extension
cp -p ${PGDATAOLD}/postgresql.conf ${PGBASEDIR}/confbkp/postgresql.conf.93
cp -p ${PGDATAOLD}/pg_hba.conf ${PGBASEDIR}/confbkp/pg_hba.conf.93
cp -p ${PGDATAOLD}/recovery.conf ${PGBASEDIR}/confbkp/recovery.conf.93 # if exists
# If any other conf files are in use, back up those too.
9. Drop incompatible views and functions
User: postgres
Changes to the pg_stat_activity view rendered some of the views in our databases unusable, and more importantly, were causing the pg_upgrade process to fail if those views and functions were not dropped before the upgrade was executed.
If incompatible views and functions exist in your environment, remove them at this point. Some incompatibilities are listed at:
https://wiki.postgresql.org/wiki/New_in_postgres_10#Backwards-Incompatible_Changes
http://paquier.xyz/postgresql-2/postgres-10-incompatible-changes/
If you have any UNLOGGED tables, you might want to TRUNCATE those before shutting down the primary Postgres cluster. UNLOGGED tables are not propagated to replicas, so rsync'ing those tables to the replica is a waste of time and resources. Hat tip to Stephen Frost of Crunchy Data for pointing this out.
10. PG10 initdb
User: postgres
This step creates the new Postgres 10 cluster, which starts empty, but will be relinked to the files in the existing data directory via pg_upgrade.# As postgres OS user
${PGBINNEW}/initdb --pgdata="$PGDATANEW" --encoding=UTF8 --data-checksums
11. pg_upgrade dry run (no changes made yet)
User: postgres
This is a dry-run of the pg_upgrade command against the active primary database server. (dry-run means that no changes are made, only the output of what it would have run).
# As postgres OS user, cd to the dir above $PGDATA
cd ${PGBASEDIR}

# The "jobs" setting is based on the number of CPU cores - 1,
#   though in our environments we opted for a max of 4 cores.
# The "time" command is to get a wall-clock timing of the operation.
time ${PGBINNEW}/pg_upgrade \
--old-bindir=${PGBINOLD} \
--new-bindir=${PGBINNEW} \
--old-datadir=${PGDATAOLD} \
--new-datadir=${PGDATANEW} \
--old-port=${PGPORT} \
--new-port=${PGPORT} \
--jobs=$(nproc | awk '{ {print ($1 > 4) ? 4 : ($1 == 1 ? 1 : $1 - 1)} }') \
--link \
--username=postgres
--check # <-- this is dry-run option
12. Send WAL to remote primary
User: postgres
The purpose of this step is to flush any changes to the Write Ahead Logs (WAL), and send the current WAL segment(s) to the remote primary replica. This step is not strictly necessary, as a graceful shutdown will generate a final WAL segment on the active primary to be shipped to the remote primary (assuming you are using WAL shipping; if you are using Streaming Replication then this is unnecessary).
Note that if you are using pg_receivexlog/pg_receivewal the need to ship WALs is virtually eliminated, as long as your WAL is sending to the replicas successfully.
# Execute on the active primary.
# The examples below assume you are using the psql client, if not
#   use whichever client works in your environment.
psql -h localhost -d postgres -U postgres -p ${PGPORT} -qtAXc "checkpoint;"
psql -h localhost -d postgres -U postgres -p ${PGPORT} -qtAXc "select pg_switch_xlog();"

# Note: "pg_switch_xlog()" was renamed to "pg_switch_wal()" in PG10
13. Stop Postgres 9.3
User: sudo
Each Postgres cluster in the replica set must be stopped, though the active secondary is optional (it gets upgraded to PG 10 the following day). Stop the Postgres servers in the replica set, in order from active primary, to active secondary, to remote primary, to remote secondary. If you do leave the active secondary running, you’ll want to change the recovery.conf to not stream from the active primary (assuming that’s how you have it configured).
Tip: The remote primary should given some time to apply all the WALs from the upstream primary, so that it is fully-consistent and the upcoming rsync (step #16) ships only the few deltas.
If you’d like to confirm the remote primary has applied the WALs from the active primary:
- On the
active primary:# As postgres, in the postgres database (or really, any db) checkpoint; SELECT pg_switch_xlog(); SELECT pg_current_xlog_location(); -- keep track of this WAL offset - On the
remote primary:# As postgres, in the postgres database # Returns the replication lag in Megabytes SELECT ROUND(pg_xlog_location_diff ( '', pg_last_xlog_replay_location() ) / 1000000::NUMERIC,3) as replication_lag_mb - Stop the
active primaryPostgres cluster:# Starting/stopping Postgres depends on how your environment is set up, so use # the appropriate method for your environment. # Execute a clean, fast shutdown ("-m fast"). sudo /sbin/service postgresql stop -m fast
14. Set up Postgres config files
User: postgres
Create the custom_conf directory under $PGDATANEW
# As postgres OS user
mkdir -p ${PGDATANEW}/custom_conf
Append (as the very last line) to your PG10 postgresql.conf the new custom config directory. It is the last line because you want the settings from the files in the custom_conf directory to override anything that is in the default postgresql.conf.
echo "include_dir = 'custom_conf'" >> ${PGDATANEW}/postgresql.confAdd the custom settings file(s) to the new custom_conf directory.
Note: If you have multiple files in that custom directory, name them in order you’d like them applied, as the last-applied file overrides any earlier settings of the same name.
010_postgresql.conf
020_bgwriter.conf        # optional
030_vacuum.conf          # optional
040_memory_settings.conf # optional
Don’t forget to add any custom pg_hba settings to your new ${PGDATANEW}/pg_hba.conf file.
15. Upgrade the active primary Postgres server
User: postgres
This step is the heart of the upgrade process; it is the real pg_upgrade command.
# As postgres OS user, move to the directory above $PGDATA
cd ${PGBASEDIR}

# This is NOT a dry run!
time ${PGBINNEW}/pg_upgrade \
--old-bindir=${PGBINOLD} \
--new-bindir=${PGBINNEW} \
--old-datadir=${PGDATAOLD} \
--new-datadir=${PGDATANEW} \
--old-port=${PGPORT} \
--new-port=${PGPORT} \
--jobs=$(nproc | awk '{ {print ($1 > 4) ? 4 : ($1 == 1 ? 1 : $1 - 1)} }') \
--link \
--username=postgres
Note: We chose to do an in-place pg_upgrade using hard links (--link) for two main reasons:
- It is much faster than using symlinks and copying the
$PGDATAdata files around, particularly given our short window of downtime to accomplish each upgrade. - Due to the size of some of the databases, doubling the on-disk size until the upgrade finished was risky enough to warrant the hard links method.
The drawback of course is that once you start your new Postgres cluster you are not able to use the original cluster (more on this in the upcoming Update symlinks section).
How the hard links work with pg_upgrade is like this:
- The data files under
$PGDATA/are associated to Postgres 9.3. - The PG10 initdb command creates new system catalogs.
- pg_upgrade uses hard links to re-associate the data files in the PG 9.3 cluster to the PG 10 cluster. This is possible because every file is identified by the inode, and may have multiple file names. The hard link method takes advantage of this, so the data file name can be the same (or different) in both Postgres clusters, but both names point to the same file on your storage volume.
Warning: Check the logs emitted by pg_upgrade for any failures. If there are any failures, do not proceed on to the next step. In our upgrades, we ran into a case where one of the pg_upgrade executions failed and we didn’t catch the failure message in time, before the rsync to the remote primary occurred. In that case, fortunately it occurred in a prod-like test environment so we were able to update our monitoring to detect any subsequent cases. In this instance, the recovery was straightforward because the database was only a few GB in size and we were able to do it within the maintenance window:
- From the
active secondaryexecute a Postgres 9.3 plaintext backup. - Copy backup to
active primary - Rename existing db to
<db>_old - Create new db (mirror the original one)
- Restore the plaintext backup from 9.3 into PG 10 using
psql
16. Rsync changes to the remote primary replica
User: postgres
Read the highlighted Warning a few paragraphs down before proceeding…
In the Postgres 9.3 $PGDATAOLD data directory, optionally remove the pg_xlog directory before rsync’ing to the remote primary replica. Removing the pg_xlog directory is done so the rsync over the WAN is faster, as the remote Postgres cluster does not need the old 9.3 WAL segments.
This is “optional” because you may have a longer downtime window and the transfer to the remote primary replica is allowed to take longer, or maybe your wal_keep_segments setting is low and there are few WALs to rsync. By default, we use a very high wal_keep_segments setting in the Postgres clusters to mitigate physical replication from breaking in the face of an extended network outage between data centres.
Note: The removal of pg_xlog was done in the downtime window because we needed the rsync to complete in as little time as possible, to stay within the allotted window. On the Disaster Recovery (DR) front: After the rsync completes, in the event of a disaster we still have three viable up-to-date failover candidates. Two of them are still at Postgres 9.3 (the active secondary and remote secondary replicas), and the remote primary is now at PG 10.
Warning: Do NOT remove the 9.3 pg_xlog directory if you want to be able to start up the old cluster. At this stage, you can still start the original Postgres 9.3 cluster without having lost any data. Once the pg_xlog dir is removed, or the new Postgres 10 cluster is mv ‘d to replace the 9.3 cluster (step #17), you CANNOT go back to 9.3.
IMPORTANT: Executing this rm command is the Point of No Return!
rm -f ${PGDATAOLD}/pg_xlogThe active primary cluster is still stopped (we are still in our downtime window), so we are going to rebuild the remote primary replica by rsync’ing only the deltas to it. Without the pg_xlog and pg_log directories, this should be quick (seconds to minutes, depending on cluster size, network speeds, and if the remote replica was fully caught up when it was shut down).
# rsync the active primary cluster to the remote primary replica.
# This step is done from the active primary, a level above the PG data directory.
cd ${PGBASEDIR}

time rsync --archive --progress --delete --hard-links --no-perms \
--omit-dir-times --size-only -z --no-inc-recursive \
--exclude 'pg_log/*' \
--exclude 'pg_xlog/*' \
"$PGDATAOLD" ${REMOTE_PRIMARY_REPLICA}:${PGBASEDIR}
Set a Fact on the remote primary replica so that services know that it is now at Postgres version 10. This is removed once all servers are at PG 10, and code paths have been updated to no longer rely on that Fact’s existence.
echo "is_pg_10=true" > /etc/facter/facts.d/is_pg_10.txt Head-scratcher
One oddity we encountered a few times that has to-date not been explained well enough for my liking is an issue with the remote primary not coming up cleanly after the rsync, with timeline errors being thrown in the log.
My current theory is that pg_upgrade is resetting the timeline to 1, and in some cases we have previously failed-over which incremented the timeline at some point far in advance of the pg_upgrade run. It is possible that we didn’t copy the history file over to the remote primary properly, so it could not determine that the timeline had been reset - a timeline increment would likely have “just worked” thanks to recovery_target_timeline=latest in the recovery.conf, but a timeline decrement needs different handling.
This is only a theory though, as the rare cases where replication did not work properly the first time we had to kick off a physical replication rebuild job without delay, thus removing any chance for further investigation.
17. Update Symlinks and replace the old data directory with the new one
User: sudo
In our servers, we have a few symlinks we use for convenience. Update those at this point.
sudo rm -f /usr/pgsql
sudo rm -f /usr/bin/pg_config
sudo rm -f /usr/pgsql/bin/pg_config
sudo ln -s ${PGBINNEW} /usr/pgsql
sudo ln -s ${PGBINNEW}/pg_config /usr/bin/pg_config
18. mv the new Postgres 10 data directory to $PGDATA
User: postgres
WARNING: After this point the original Postgres 9.3 CANNOT be restarted, you can only move ahead with the upgrade. Of course, this warning only applies if you did not remove pg_xlog in step #16. If you did, that was the Point of No Return.
# As postgres OS user
# Do this on both active primary and remote primary.
# There is no going back after these steps!
mv ${PGDATAOLD} ${PGDATAOLD}93
mv ${PGDATANEW} ${PGDATAOLD}
19. Add recovery.conf to the remote primary hot standby
User: postgres
On the remote primary replica, copy the previously-backed-up recovery.conf to $PGDATAOLD or replace it with a PG-10 specific one. Note: “$PGDATAOLD” is now pointing to Postgres 10, not 9.3, so don’t be confused by the OLD suffix.
# Modify the PG10 recovery.conf as necessary
cp -p ${PGBASEDIR}/confbkp/recovery.conf.93 ${PGDATAOLD}/recovery.conf
20. Update services
User: sudo
Update the System V or systemd services to be able to stop/start Postgres, and have it start on server boot. Choose the appropriate method for your server.
# init.d symlink
if [ -e /etc/init.d/postgresql ]; then
    sudo -i ln -f -s /etc/init.d/postgresql-10 /etc/init.d/postgresql
    sudo -i chkconfig --level 345 postgresql-10 on
fi

# systemd symlink
if [ -e /etc/systemd/system/postgresql.service ]; then
    sudo -i ln -f -s /etc/systemd/system/postgresql-10.service /etc/systemd/system/postgresql.service
    sudo systemctl daemon-reload
fi
21. Start Postgres 10
User: sudo
Start Postgres 10 on the active primary, then the remote primary, using whichever command is appropriate for your environment.
sudo /sbin/service postgresql start
22. Check system catalogs for problems
User: postgres
[Optional but recommended], Test the integrity of your Postgres system catalogs in the active primary using pg_catcheck before opening the system up for use.
23. Minimal ANALYZE
User: postgres
Below is an example shell script that can be run in the downtime window to gather basic statistics for the query planner, so when access to the databases is restored, incoming queries do not encounter a statistics-less database (which could result in terrible query plans until stats were gathered, and indeed, this happened in our earlier upgrades!). Unfortunately, pg_upgrade does not yet have the ability to copy over statistics from the cluster being upgraded from but there was some discussion in the Postgres mailing lists that it might be supported in a future version of pg_upgrade.
#!/usr/bin/env bash
# Purpose:
#   Execute a series of fast, parallelized ANALYZE commands against
#   the top tables, ordered by index scan counts.
#   "--jobs" flag requires Postgres 9.5+
# Usage: bash minimal_analyze.sh "your_db_name"
# Can change the LIMIT from 30 tables to a value more appropriate for your env.
set -o errexit
set -o pipefail
set -o nounset

DB_TO_USE=$1

# Parallel jobs count set to 10, tweak as necessary.
if [ -n "$DB_TO_USE" ]; then
    VAC_QUERY="WITH t AS (
        SELECT '-t '''||
            quote_ident(schemaname)||'.'||
            quote_ident(relname)||'''' AS tables_to_analyze
        FROM pg_catalog.pg_stat_user_tables
        ORDER BY idx_scan DESC NULLS LAST
        LIMIT 30)
    SELECT 'vacuumdb --dbname='''||
        current_database()||
        ''' --analyze-only --jobs=10 '||
        string_agg(tables_to_analyze, ' ')
    FROM t";

    # Generate the vacuumdb command to run, using the top tables,
    #   sorted by index scan count descending.
    # "timeout 10" will cancel the command after 10 seconds, because
    #   this query should be a very quick query to execute.
    VAC_CMD=$(timeout 10 psql -d "$DB_TO_USE" -U postgres -h localhost -p ${PGPORT} --pset=pager=off -qtAXc "$VAC_QUERY" 2>/dev/null)

    # Adjust the stats target number according to how long the ANALYZE
    #   takes. If you are going to go past your allotted maintenance window,
    #   drop the default_statistics_target lower for subsequent runs.
    timeout 10 psql -h localhost -d postgres -U postgres -p ${PGPORT} \
      -qtAXc 'ALTER SYSTEM SET default_statistics_target=5' \
      -qtAXc 'SELECT pg_reload_conf()'

    # Execute the vacuumdb command.
    eval "$VAC_CMD"

    # Reset the cluster-wide default_statistics_target setting.
    # Note: Must ensure default_statistics_target is reset, otherwise the temporary
    #   low setting could result in future suboptimal query plans.
    timeout 10 psql -h localhost -d postgres -U postgres -p ${PGPORT} \
      -qtAXc 'ALTER SYSTEM RESET default_statistics_target' \
      -qtAXc 'SELECT pg_reload_conf()'
fi
24. Update extensions
User: postgres
Depending on which extensions you are using, it might be as simple as executing in each database the output of:
SELECT 'ALTER EXTENSION ' || quote_ident(extname) || ' UPDATE;' FROM pg_catalog.pg_extension;It is highly recommended that you examine the docs for each extension you are using, before running ALTER EXTENSION, in case there are scripts or extra steps required.
25. Restart Postgres
User: sudo
If you updated any extensions, you may want to restart Postgres to clear any shared memory or lingering cache. This is precautionary only (as in, no evidence was found that this was required).
26. Unblock database server access
User: sudo
Open up the Postgres server to connections (hint, it’s the converse of step #7)
sudo iptables -D INPUT -j DROP -p tcp --destination-port ${PGPORT} -i eth0Note: to check the status of ports:
sudo iptables -nvL
27. Start services
Start any business-specific services. This could be micro-services, web UI’s, API’s, basically whatever you stopped at step #6.
28. Update service discovery systems
If your business has any service discovery systems (for example, Consul, Zookeeper, etcd) that need to be updated, now is probably a good time to do that.
29. Remove facts
Remove the pg10_upgrade_in_progress Fact and do_not_run_backup file so that scheduled jobs can run as usual. Again, which files and/or Facts are specific to your situation.
30. Resume alerting
Unpause any alerting systems that were paused in step #3.
31. ANALYZE & VACUUM
User: postgres
ANALYZE, then VACUUM all databases in your cluster. If some databases require more immediate attention, do those first. The recommended method is to use vacuumdb which allows the process to use multiple worker processes to complete faster, at the expense of server resources. Knowledge of your server’s resource limits will determine if changing the number of jobs in the vacuumdb command is desirable.
# Sample psql commands
psql -h localhost -p ${PGPORT} -d "$DBNAME" -U postgres -P pager=off -qtAXc 'ANALYZE'
psql -h localhost -p ${PGPORT} -d "$DBNAME" -U postgres -P pager=off -qtAXc 'VACUUM'

# Or using vacuumdb
# ANALYZE using vacuumdb
vacuumdb -h localhost --dbname="$DBNAME" --analyze-in-stages -p ${PGPORT} -U postgres --jobs=5
# VACUUM using vacuumdb
vacuumdb -h localhost --dbname="$DBNAME" --verbose -p ${PGPORT} -U postgres --jobs=5
A useful query to track vacuum progress in Postgresql 10, based on the pg_stat_progress_vacuum view.
SELECT
    p.pid,
    clock_timestamp() - a.xact_start AS duration,
    coalesce(wait_event_type ||'.'|| wait_event, 'f') AS waiting,
    (CASE
        WHEN a.query ~ '^autovacuum.*to prevent wraparound' THEN 'wraparound'
        WHEN a.query ~ '^vacuum' THEN 'user'
        ELSE 'regular'
    END) AS mode,
    p.datname AS database,
    p.relid::regclass AS table,
    p.phase,
    pg_size_pretty(p.heap_blks_total *
        current_setting('block_size')::int) AS table_size,
    pg_size_pretty(pg_total_relation_size(relid)) AS total_size,
    pg_size_pretty(p.heap_blks_scanned *
        current_setting('block_size')::int) AS scanned,
    pg_size_pretty(p.heap_blks_vacuumed *
        current_setting('block_size')::int) AS vacuumed,
    (CASE WHEN p.heap_blks_total > 0 THEN
        round(100.0 * p.heap_blks_scanned /
            p.heap_blks_total, 1) else 0 end) AS scanned_pct,
    (CASE WHEN p.heap_blks_total > 0 THEN
        round(100.0 * p.heap_blks_vacuumed /
            p.heap_blks_total, 1) else 0 end) AS vacuumed_pct,
    p.index_vacuum_count,
    round(100.0 * p.num_dead_tuples /
        p.max_dead_tuples,1) AS dead_pct
FROM pg_catalog.pg_stat_progress_vacuum AS p
JOIN pg_catalog.pg_stat_activity AS a USING (pid)
ORDER BY duration DESC;
32. Test indexes
User: postgres
Using amcheck, test for any broken indexes. Note that the version of amcheck (by Peter Geoghegan) might be newer than the version we used, and have new features, so check there for updates.
# This anonymous pl/pgsql block should be run on the active primary
# It will emit a line for any index that appears to be corrupted.
# Comment out the "AND n.nspname = 'pg_catalog'" line if you want to check
#   every index and not just the system catalog indexes.
DO $$
DECLARE
    rec RECORD;
    current_index TEXT;
BEGIN
IF (select true from pg_catalog.pg_extension where extname like 'amcheck%') IS TRUE THEN
    FOR rec IN
        SELECT  n.nspname as schema_name,
                c.relname as index_name,
                c.relpages,
                c.oid as index_oid
        FROM pg_index i
        JOIN pg_opclass op ON i.indclass[0] = op.oid
        JOIN pg_am am ON op.opcmethod = am.oid
        JOIN pg_class c ON i.indexrelid = c.oid
        JOIN pg_namespace n ON c.relnamespace = n.oid
        WHERE am.amname = 'btree'
        AND n.nspname = 'pg_catalog' /* comment out to check all indexes */
        -- Don't check temp tables, which may be from another session
        -- and do not check unlogged relations.
        AND c.relpersistence not in ('u','t')
        -- Function may throw an error when this is omitted:
        AND i.indisready
        AND i.indisvalid
        AND c.relkind = 'i'
        ORDER BY n.nspname, c.relname
    LOOP
        BEGIN
            current_index := coalesce(rec.schema_name::TEXT,'public')||'.'||rec.index_name::TEXT;
            --RAISE NOTICE 'About to check index %', current_index;
            PERFORM bt_index_check(index => rec.index_oid);
            PERFORM bt_index_parent_check(index => rec.index_oid);
        EXCEPTION
            WHEN others THEN
                RAISE WARNING 'Failed index check for index %',current_index;
        END;
    END LOOP;
ELSE
    RAISE NOTICE '"amcheck" extension does not appear to be installed.';
END IF;
END;
$$;
33. Upgrade remote secondary replica
User: postgres
Rebuild the remote secondary replica from the remote primary using whatever method works best for your environment. Within the LAN we use pg_basebackup to rebuild physical replication to the hot standby. Over the WAN, we also use pg_basebackup, but it is done through an ssh tunnel with compression. Before you start this step, ensure the remote primary replica has applied any WALs generated by the active primary since the rsync finished, so restartpoints can force its state to disk.
# Sample pg_basebackup command, run as postgres, on the remote secondary replica.
# Modify to suit your environment.
# ACTIVE_OR_REMOTE_PRIMARY is the IP/host of the upstream source.
pg_basebackup --pgdata=$PGDATA --host=$ACTIVE_OR_REMOTE_PRIMARY \
--port=$PGPORT --username=replication --no-password \
--wal-method=stream --format=plain --progress --verbose
34. Clean up the hosts
User: postgres
For each server that has been upgraded, clean up the cruft from the older version of Postgres.
# Check if Postgres is up before proceeding.
/usr/pgsql-10/bin/pg_isready -q -t3 -p ${PGPORT} && RET=0 || RET=1
if [ "$RET" -ne 0 ]; then
    # Abort, Postgres does not appear to be running.
    echo "Postgres does not appear to be running. Investigate."
    return
fi
Clean up cruft.
# Check that the cluster is running Postgres 10
postgres_version=$(cat ${PGDATA}/PG_VERSION)
if [ -n "$postgres_version" ] && [ "$postgres_version" -eq 10 ]; then
    # WARNING: Replace the PGDATAOLD variable below with the
    #   old cluster name (if different). If you have been following these steps,
    #   it should have "93" as the suffix (your suffix could be different).
    rm -rf ${PGDATAOLD}93
fi
35. Upgrade active secondary replica [next day]
We chose to wait 24 hours after the main Postgres 10 upgrade to upgrade the remaining member of the replica set, the active secondary replica. The reason was, we were monitoring closely to be sure that the upgrade didn’t have any bugs or problems that would manifest after a full day of production-level usage. If so, we could use the still-at-Postgres-9.3 database cluster as our failsafe instance. After 24 hours our RPO would be violated, so if we did need to use that particular replica, it would need to be recovered from backup if we were past the 24 hour mark; thus keeping that server at PG 9.3 was no longer desirable 24 hours after the initial replica set upgrade.
Note: This secondary upgrade process was run by a second Jenkins pipeline, devoted strictly to updating the secondary replicas, but for the sake of clarity that process has been merged into the main timeline in this document.
The steps you’ll likely need to run are: 3, 4, 5, 13. Next step is rebuild the active secondary replica from the active primary. As shown in step 33, we use pg_basebackup.
Then continue on with steps 17, 18, 19, 20, 21, 29, 30, 34.
Failure Cases
Note that this is only a subset of the scenarios we listed and planned for that could impact us during various stages of the upgrade.
Problem: Middle of rsync to remote primary replica, loss of remote DC.
Solution: The priority here is to get the active primary open for the client within the outage window, otherwise we will violate our SLAs. Bring this database up (ensure beforehand you have recent and working backups!), and rebuild replication using pg_basebackup once the remote DC is available again.
Problem: Middle of rsync to remote primary, the rsync fails.
Solution: If you have time within your downtime window to retry the rsync, do so. Any files that have already been transferred will not be transferred again (assuming you are using the rsync command suggested at step 16). If you are in jeopardy of overrunning the downtime window, cancel the rsync job and continue on with the steps to open the active primary up for general use, and follow up with a replication rebuild to the remote primary. Note that if this occurs, you do not have a strong disaster recovery (DR) failover target until the replication finishes successfully, other than the remote secondary which is still on the earlier version of Postgres.
Problem: Failure of pg_upgrade on the active primary.
Solution: Attempt to revert to original (9.3) version. If this fails, promote the active secondary hot standby as the new master. Alternatively, fail over to the remote primary hot standby.
Problem: The active primary and remote replicas are corrupted, leaving only the active secondary replica as a viable candidate, which still at version 9.3.
Solution: STONITH all members of replica set, other than the single working Postgres cluster. Take a backup immediately if you can, and ensure it does not overwrite any existing backups. If you suspect physical corruption of your database, stop the database and take a file-system copy and store it somewhere safe in case it becomes necessary for disaster recovery or later analysis.
Problem: Loss of all databases in a replica set.
Solution: Recover from backup.
Problem: Bug in the database software corrupts the active-master.
Solution: Fail over to the remote primary, be vigilant for other examples of the bug manifesting. Upgrade to the newest version of Postgres if one exists. Create a detailed case to send to the Postgresql core developers (ideally with reproduction steps) for analysis and bug fixing.
Problem: Bug in the database software takes out many Postgres servers.
Solution: Spin up a new replica sets with a older major version of Postgres and restore backups to these new servers.
Problem: Corrupted indexes.
Solution: REINDEX the affected indexes. If corruption reoccurs, there might be an underlying hardware issue, or software bug. See the Postgres wiki for more details.
Notes
- Regular meetings with stakeholders was crucial to stay on track and keep everyone informed of the progress of the planning, and the execution. The stakeholders comprised Engineering and QA leads, and the business and support leads. The latter were on the front line dealing with client expectations and keeping clients informed of our progress, as well as dealing with any customer issues or questions as we progressed through the execution phase. The main team (the three of us executing the changes) were in constant communication, and the weekly meetings included the stakeholders. It is very important that the lines of communication remain open and frictionless, to ensure the best outcome possible, and we were fortunate to have a great team involved with this large undertaking.
- Because we jumped so many major Postgres versions, strenuous load testing in production-like environments is highly recommended. In one case, an important function used to recursively resolve group memberships became roughly 20% slower (a difference of a few tens of milliseconds) but that was enough to cause an overall decrease in performance of a critical part of our application. This is the kind of issue that is best caught in development/test and fixed before it can make it to production.
- Peer review of all changes was very helpful in catching potential problems before we proceeded with the upgrade. The old adage “can’t see the forest for the trees” came into play at times, when were became so focused on the immediate changes that we were neglecting some of the bigger picture. Fortunately the manager running the project was very good at his job and regularly asked questions to get us to refocus on what we were trying to achieve from a higher level.
- Clear documentation, with diagrams, is a valuable aid to explaining to others what we were trying to achieve and to forestall some of the questions about the upgrade would work.
- A clear timeline to follow, with milestones, is critical to help stay on track. Be realistic with your timelines, there are always going to be failures or things that come up that cause slippage in your dates and times, so add some buffer to your estimates to account for that.
- During testing, invest in your test harness. If you are able to create production-like loads there will be fewer surprises when you execute the migration for real.
Extras
PostgreSQL pg_upgrade docs: pg_upgrade
Postgresql mailing lists
Postgresql IRC